Zoma's Citadel Conquered: Unravel the Secrets of Dragon Quest 3's Epic Dungeon
Okay, buckle up, adventurers! We're diving headfirst into Zoma's Citadel in the *Dragon Quest 3 Remake*, the ultimate showdown that'll test your mettle (and your party's HP!). This ain't no walk in the park; it's the toughest challenge in the main story, so get ready to unleash your inner hero!
- By Eleanor
- Jan 20,2025
Okay, buckle up, adventurers! We're diving headfirst into Zoma's Citadel in the *Dragon Quest 3 Remake*, the ultimate showdown that'll test your mettle (and your party's HP!). This ain't no walk in the park; it's the toughest challenge in the main story, so get ready to unleash your inner hero!
### How to Reach Zoma's Citadel: A Quick Trip Through Rainbow Land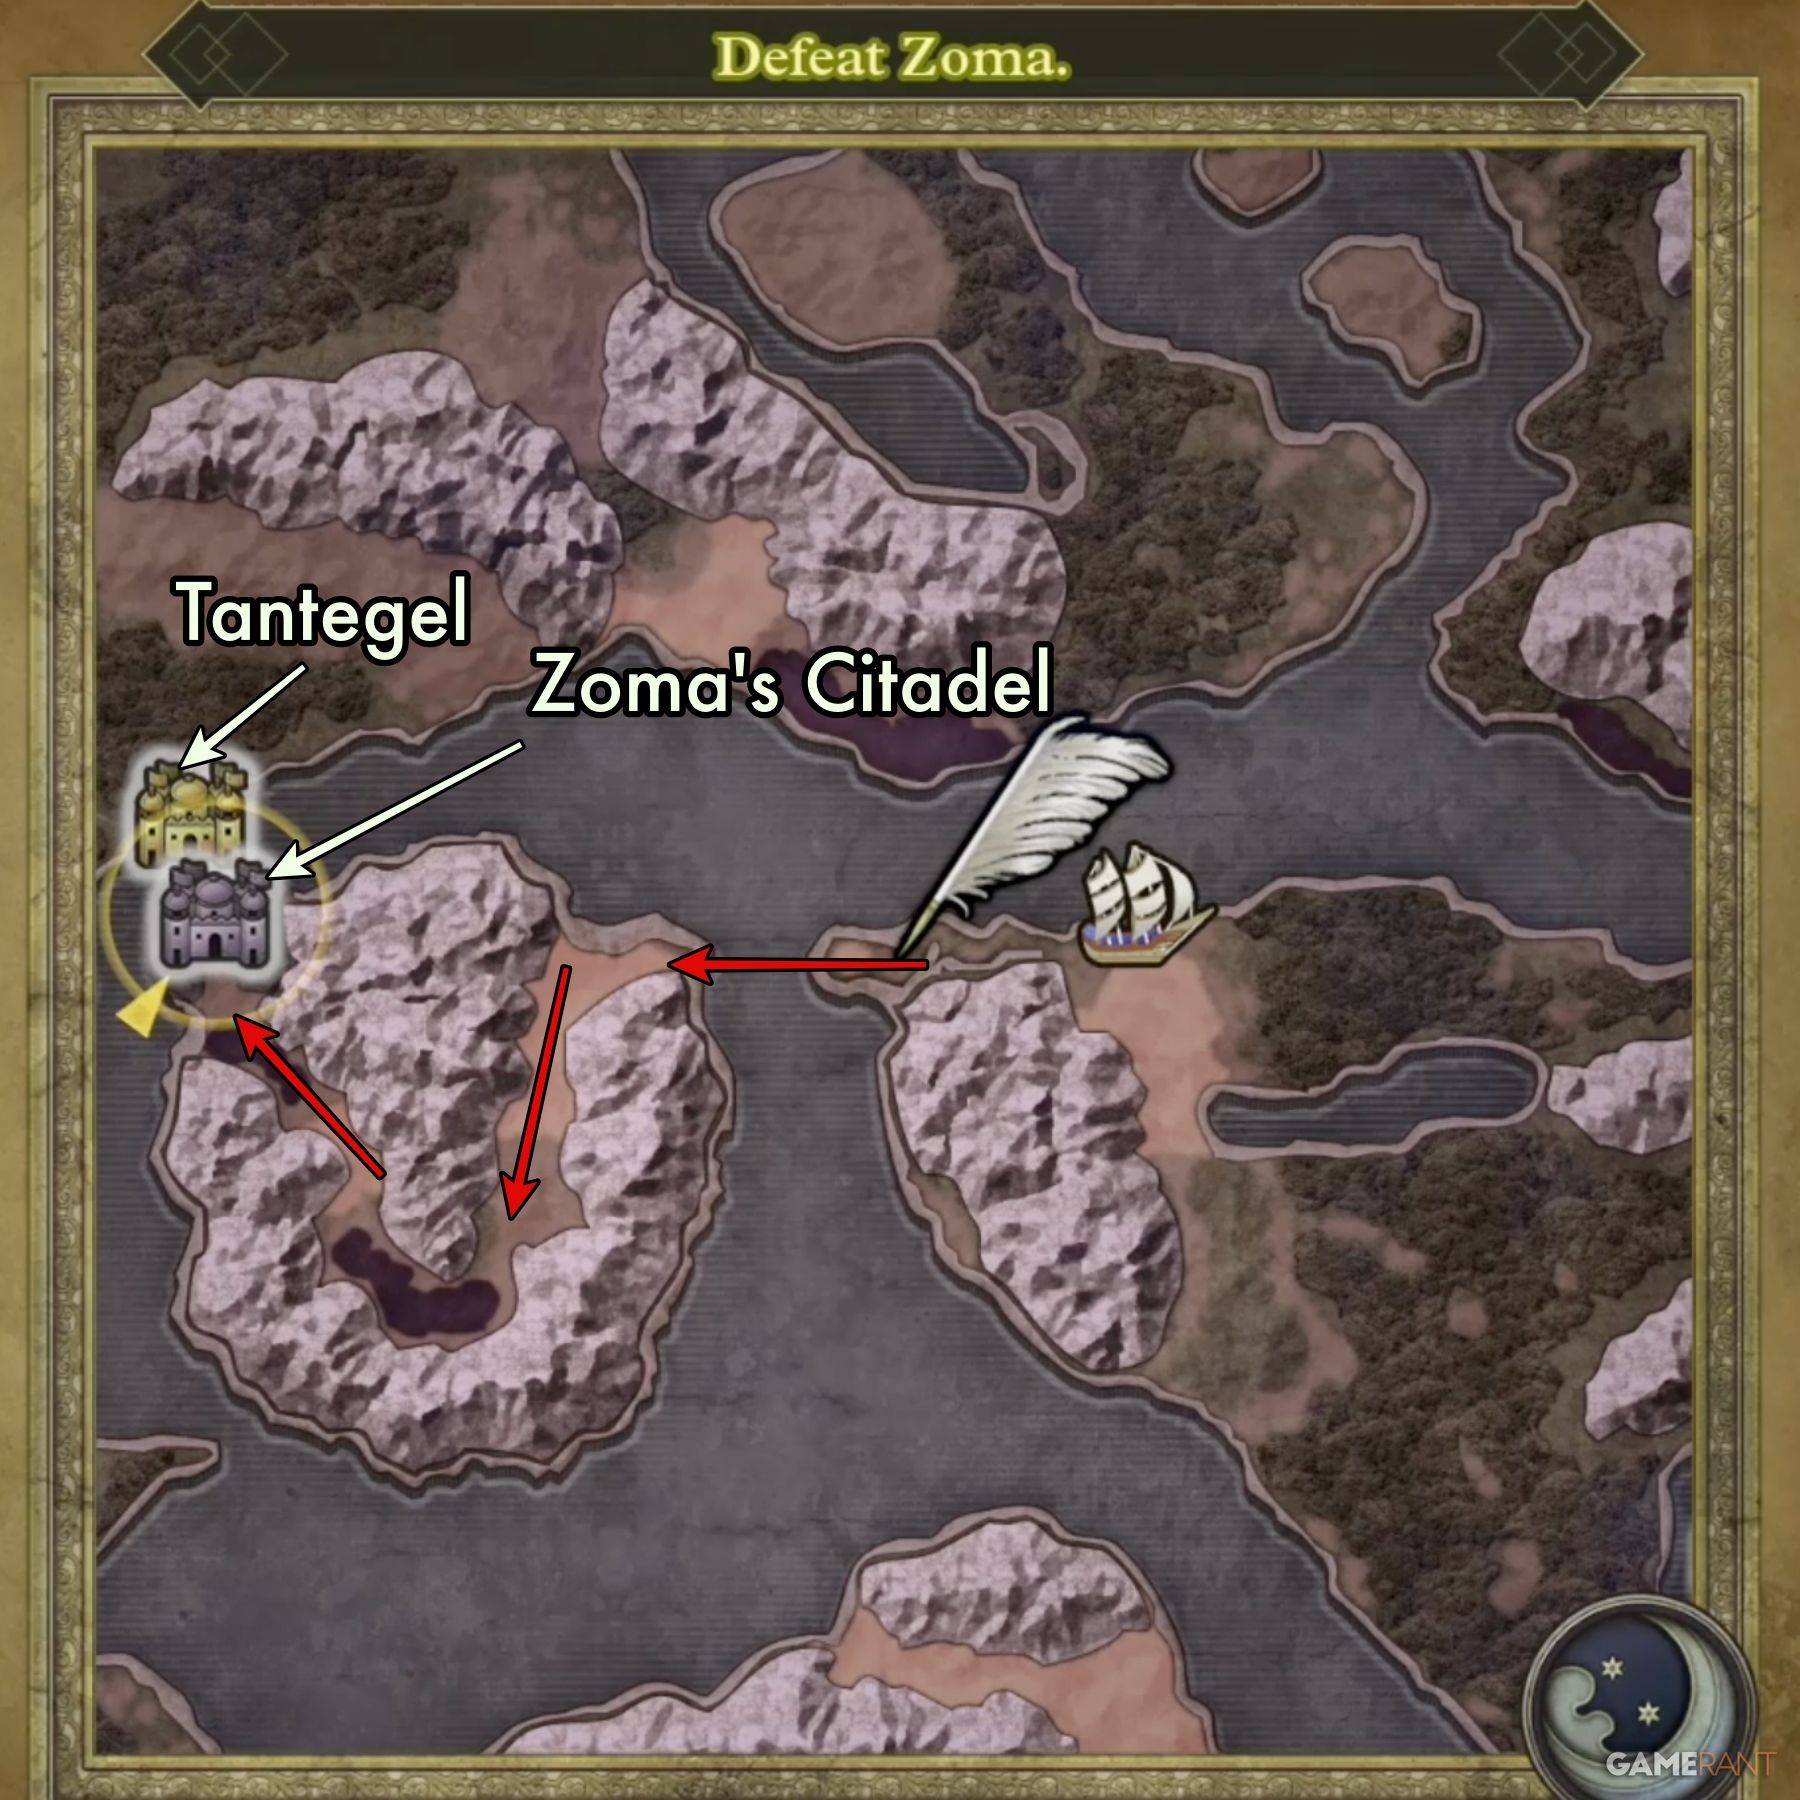 After you totally wreck Baramos (yeah, you!), you'll find yourself in Alefgard – a permanently gloomy place, but hey, at least it's dramatic! To get to Zoma's Citadel, you gotta craft the Rainbow Drop. Think of it as a super-powered key. Here's the recipe:
* **Sunstone:** Grab this from Tantegel Castle. It's probably not hiding under a rock, so keep your eyes peeled.
* **Staff of Rain:** The Shrine of the Spirit is where this one's chillin'.
* **Sacred Amulet:** Rescue Rubiss from the top of her tower (you'll need the Faerie Flute for this). She'll reward you handsomely!
Once you've got all three, BAM! Rainbow Drop assembled. Use it to build the Rainbow Bridge – your personal VIP express lane to Zoma's Citadel.
After you totally wreck Baramos (yeah, you!), you'll find yourself in Alefgard – a permanently gloomy place, but hey, at least it's dramatic! To get to Zoma's Citadel, you gotta craft the Rainbow Drop. Think of it as a super-powered key. Here's the recipe:
* **Sunstone:** Grab this from Tantegel Castle. It's probably not hiding under a rock, so keep your eyes peeled.
* **Staff of Rain:** The Shrine of the Spirit is where this one's chillin'.
* **Sacred Amulet:** Rescue Rubiss from the top of her tower (you'll need the Faerie Flute for this). She'll reward you handsomely!
Once you've got all three, BAM! Rainbow Drop assembled. Use it to build the Rainbow Bridge – your personal VIP express lane to Zoma's Citadel.
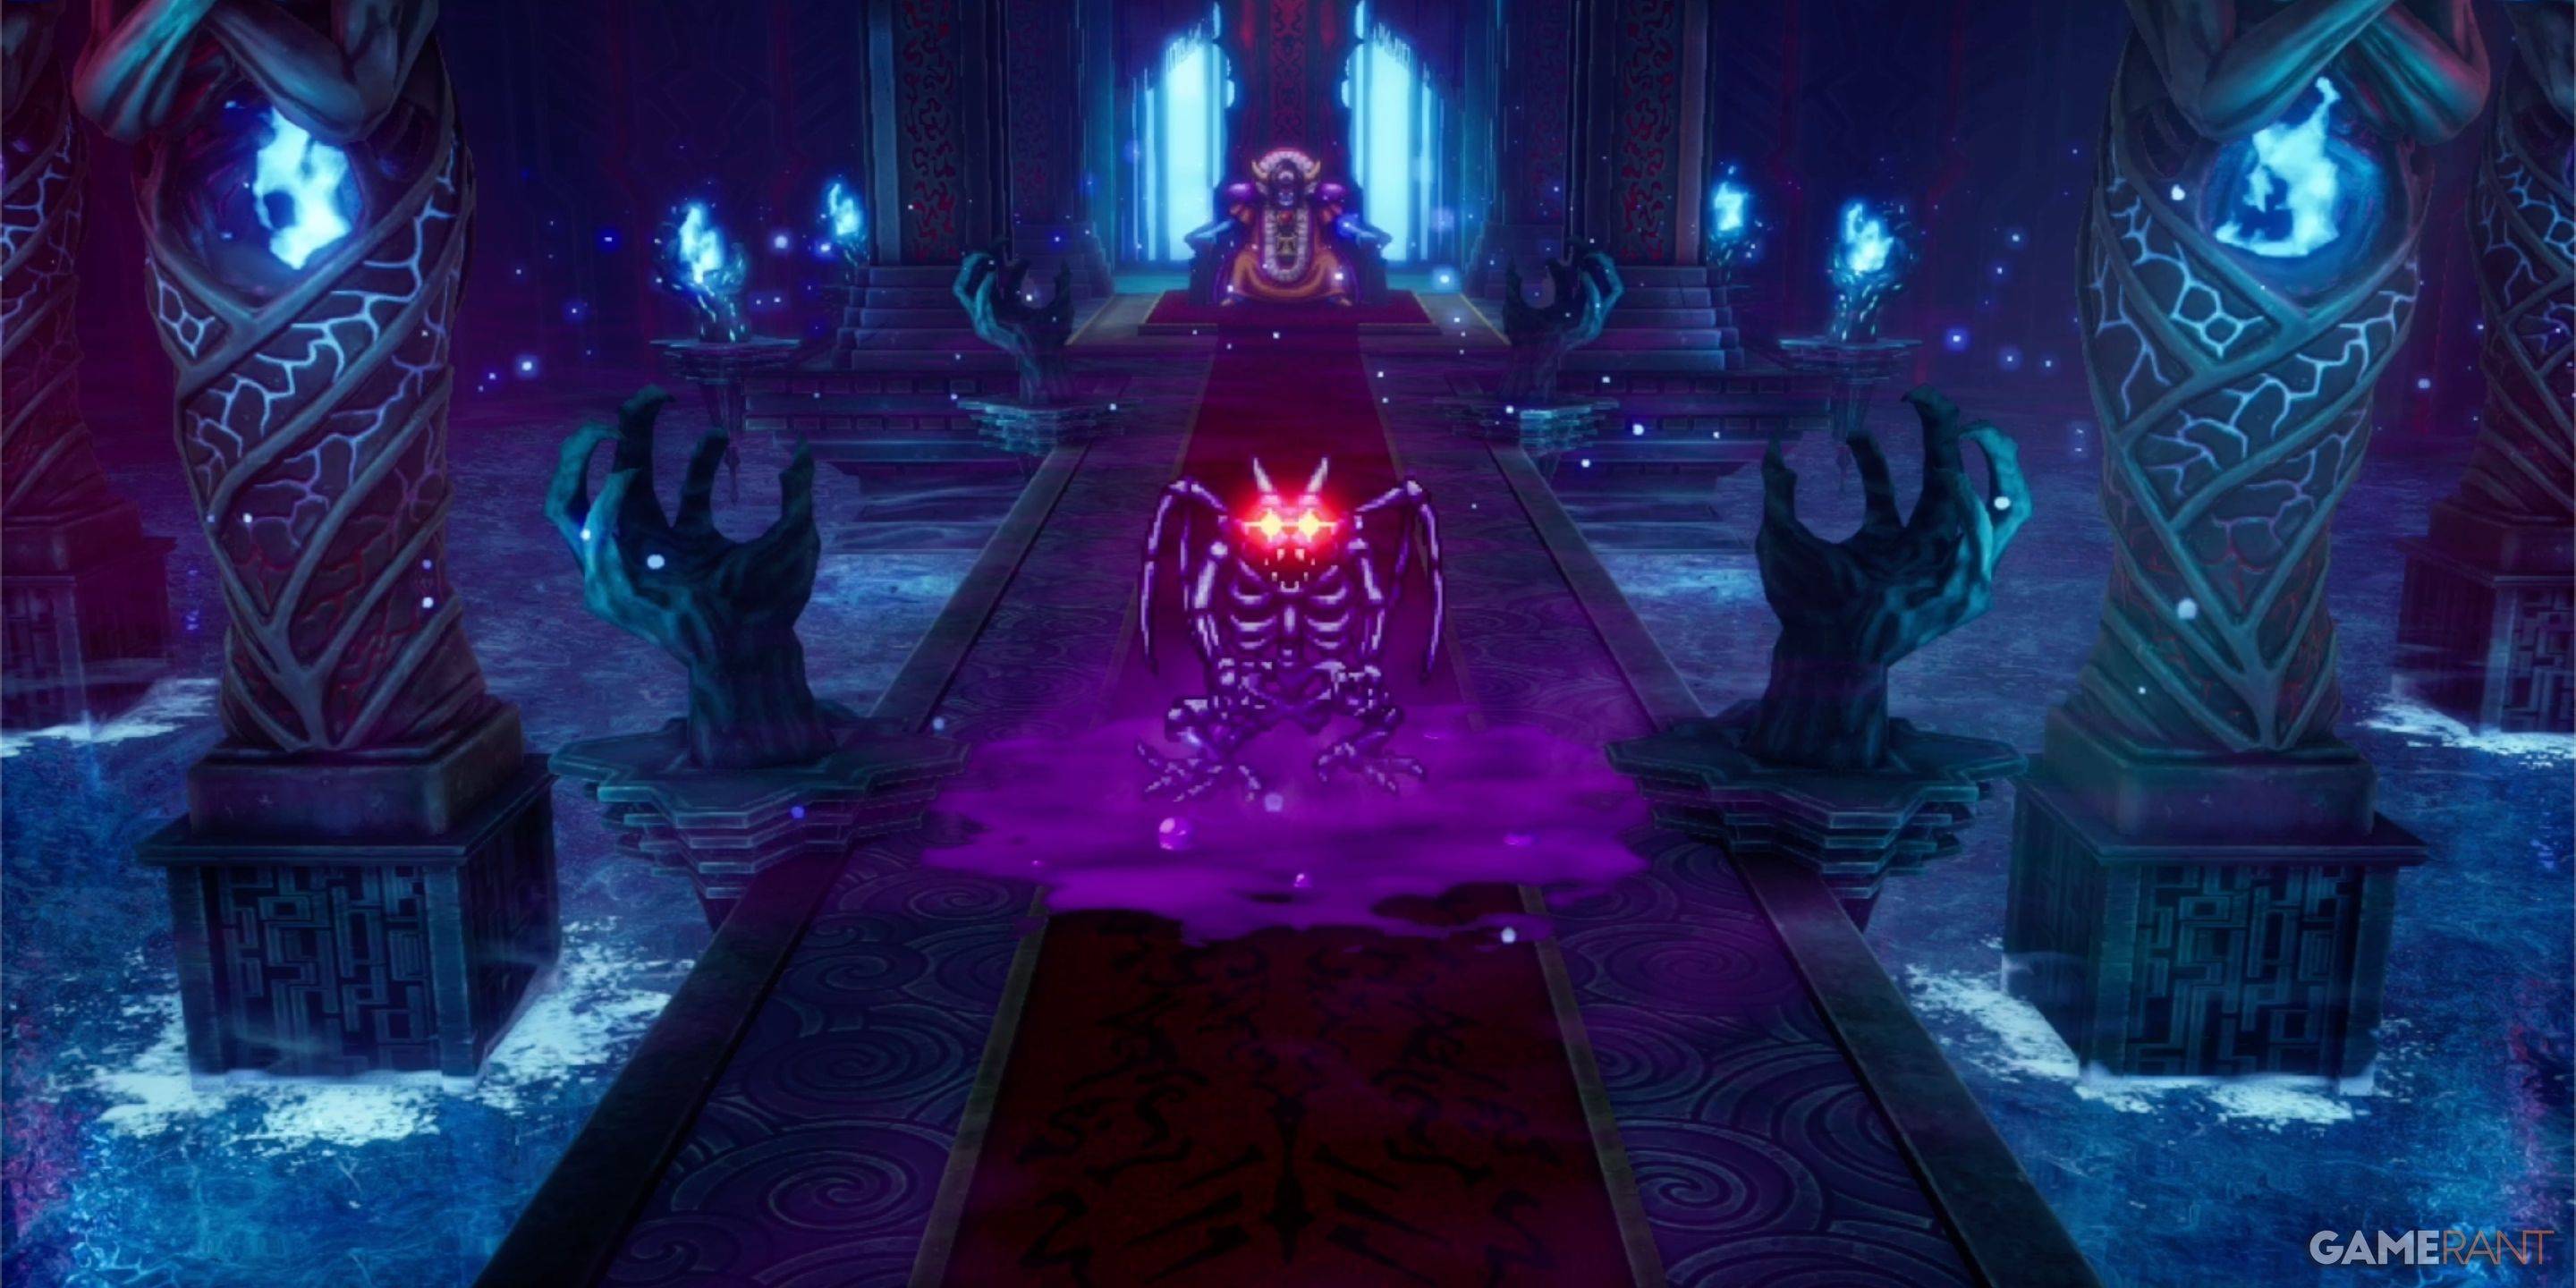
### Zoma's Citadel 1F: Navigating the First Floor Maze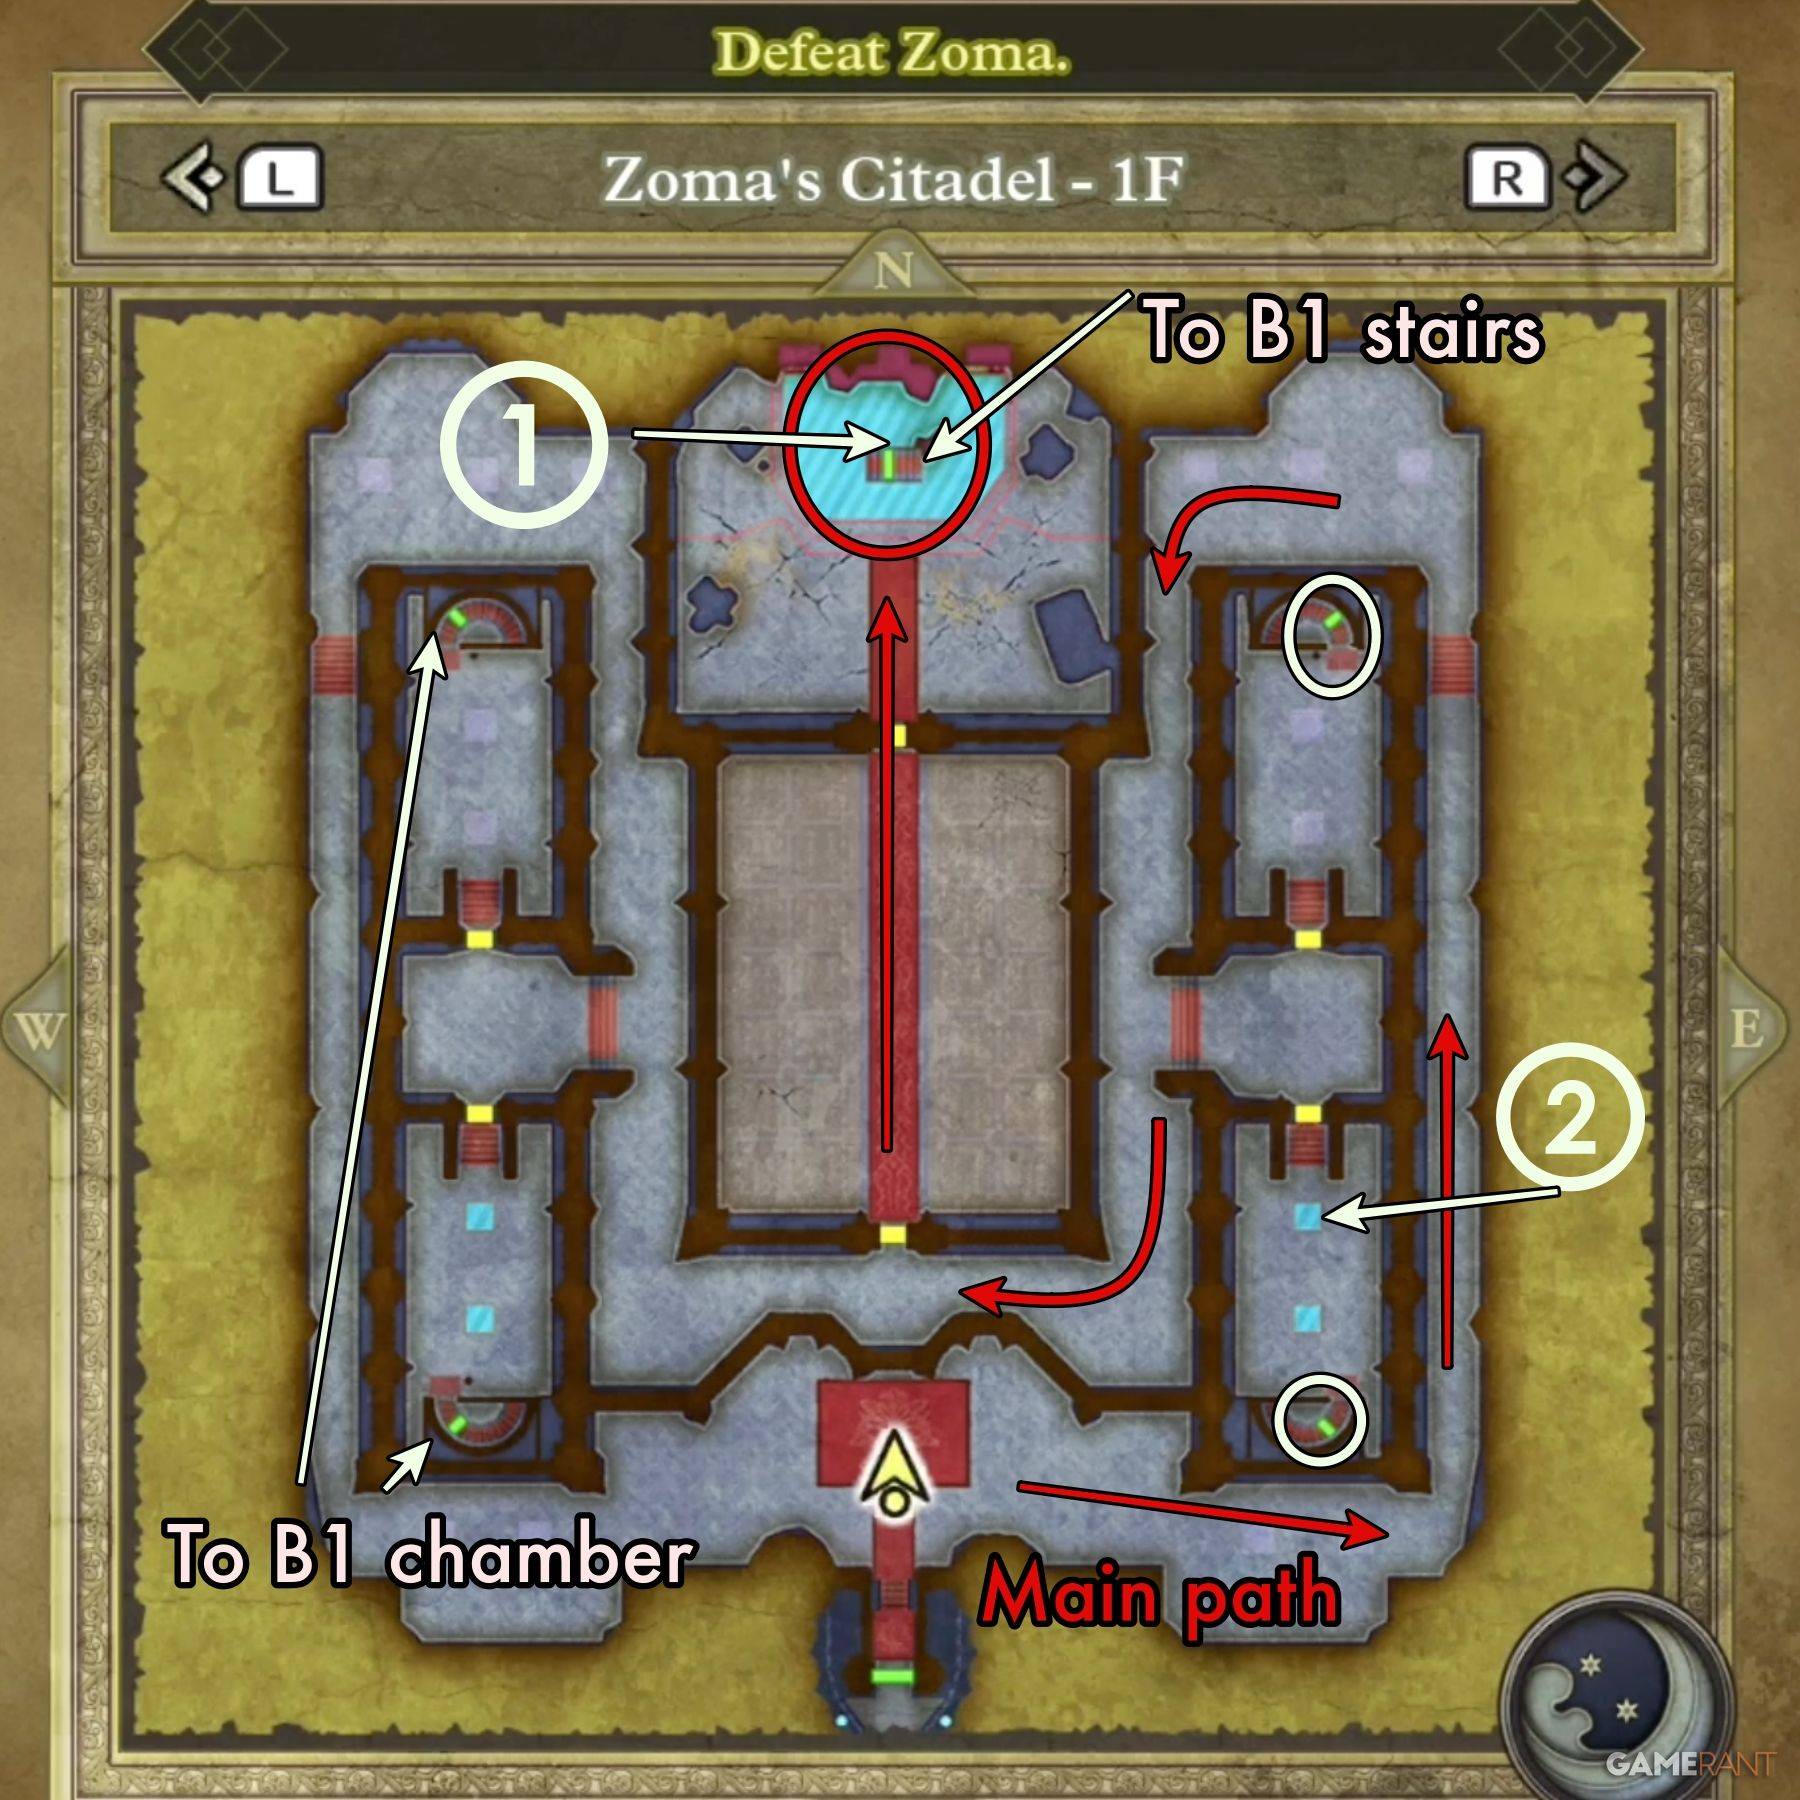 The first floor is a bit of a head-scratcher, but don't sweat it. The main goal is to find that throne – it's a secret passage in disguise! You'll need to go around the east or west side of the chamber before finding the door to the central area. Check the map above for the exact route. There are some goodies tucked away in the side chambers, so explore! You'll face a bunch of Living Statues in the central chamber. They're tough, but nothing you can't handle with a solid strategy.
**1F Treasure:**
* Mini Medal (buried behind the throne)
* Seed of Magic (check the electrified panel – be careful!)
The first floor is a bit of a head-scratcher, but don't sweat it. The main goal is to find that throne – it's a secret passage in disguise! You'll need to go around the east or west side of the chamber before finding the door to the central area. Check the map above for the exact route. There are some goodies tucked away in the side chambers, so explore! You'll face a bunch of Living Statues in the central chamber. They're tough, but nothing you can't handle with a solid strategy.
**1F Treasure:**
* Mini Medal (buried behind the throne)
* Seed of Magic (check the electrified panel – be careful!)
### Zoma's Citadel B1: A Quick Stop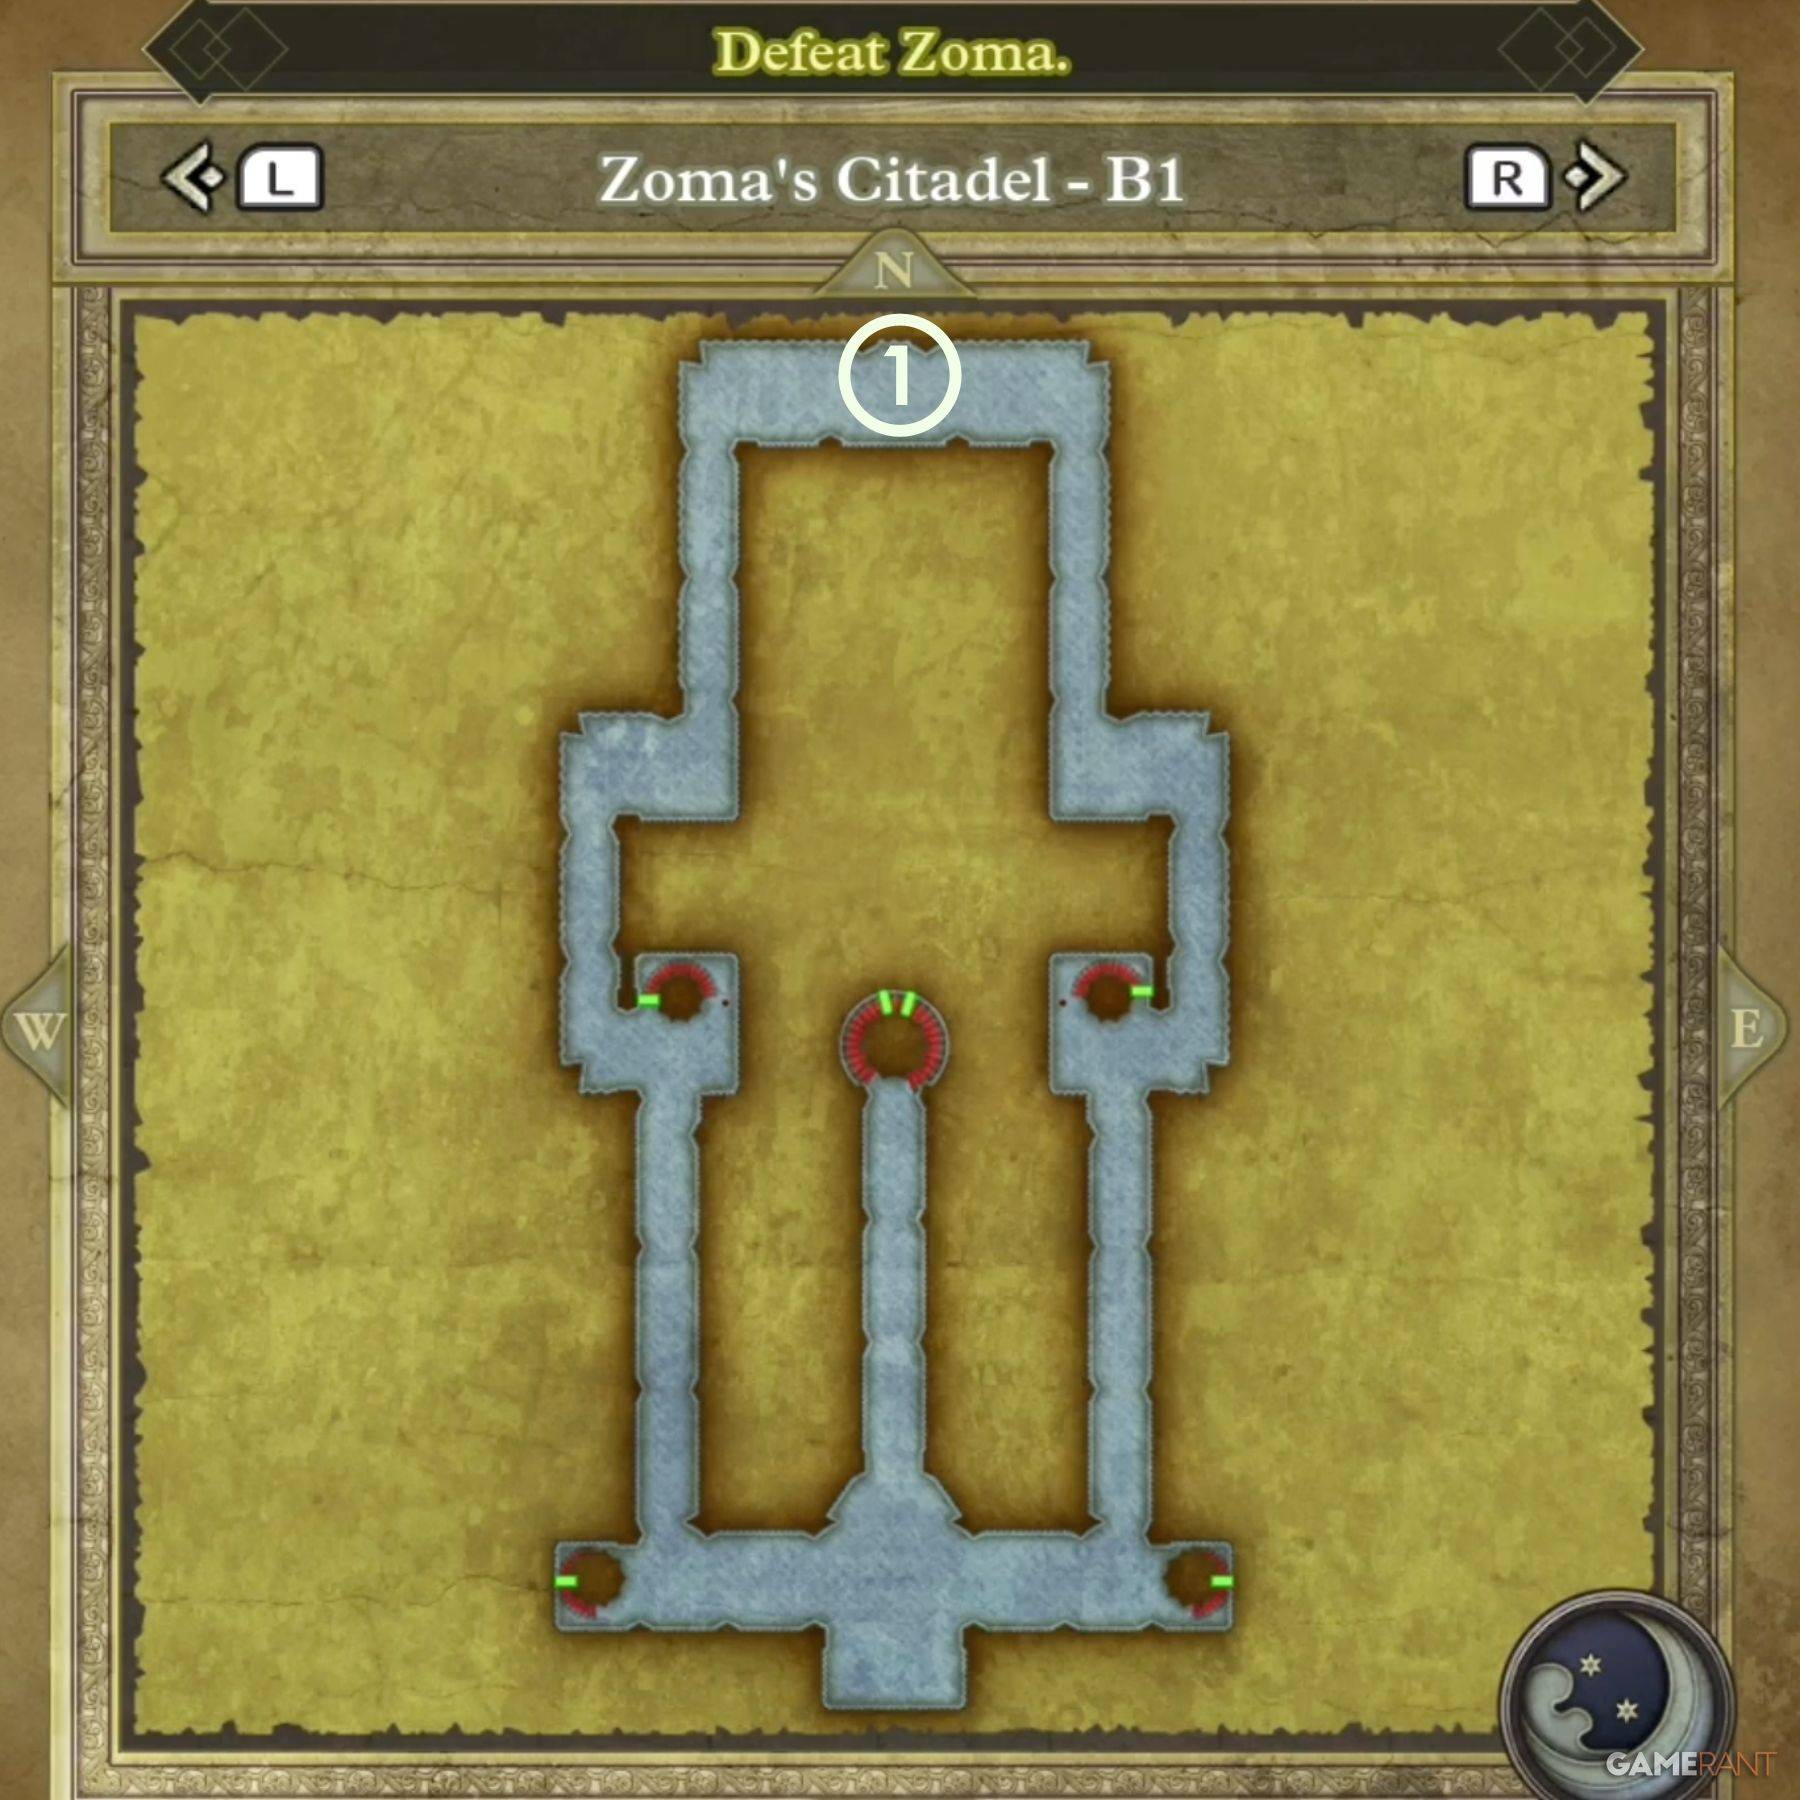 B1 is pretty straightforward. Unless you take the stairs from the small chambers on 1F, you'll just find a staircase down to B2. But if you explore the side chambers, there’s a treasure chest in the isolated B1 area:
**B1 Treasure:**
* Hapless Helm
B1 is pretty straightforward. Unless you take the stairs from the small chambers on 1F, you'll just find a staircase down to B2. But if you explore the side chambers, there’s a treasure chest in the isolated B1 area:
**B1 Treasure:**
* Hapless Helm
### Zoma's Citadel B2: Directional Tile Troubles B2 introduces the dreaded directional tiles. These things are *tricky*. The goal is to cross them to reach the stairs to B3. If you're struggling, consider practicing on the similar tiles in the Tower of Rubiss (third floor, northwest corner). They’re basically a training ground for this puzzle.
**How to conquer the tiles:** Think of the diamond-shaped tiles like a D-pad. Blue usually means North/South, Orange usually means East/West. Pay close attention to the color positions to figure out which direction to press on your D-pad. It takes some practice, but you'll get the hang of it!
**B2 Treasure:**
* Scourge Whip
* 4,989 Gold Coins (cha-ching!)
B2 introduces the dreaded directional tiles. These things are *tricky*. The goal is to cross them to reach the stairs to B3. If you're struggling, consider practicing on the similar tiles in the Tower of Rubiss (third floor, northwest corner). They’re basically a training ground for this puzzle.
**How to conquer the tiles:** Think of the diamond-shaped tiles like a D-pad. Blue usually means North/South, Orange usually means East/West. Pay close attention to the color positions to figure out which direction to press on your D-pad. It takes some practice, but you'll get the hang of it!
**B2 Treasure:**
* Scourge Whip
* 4,989 Gold Coins (cha-ching!)
### Zoma's Citadel B3: A Friendly Face (and Some Treasure!)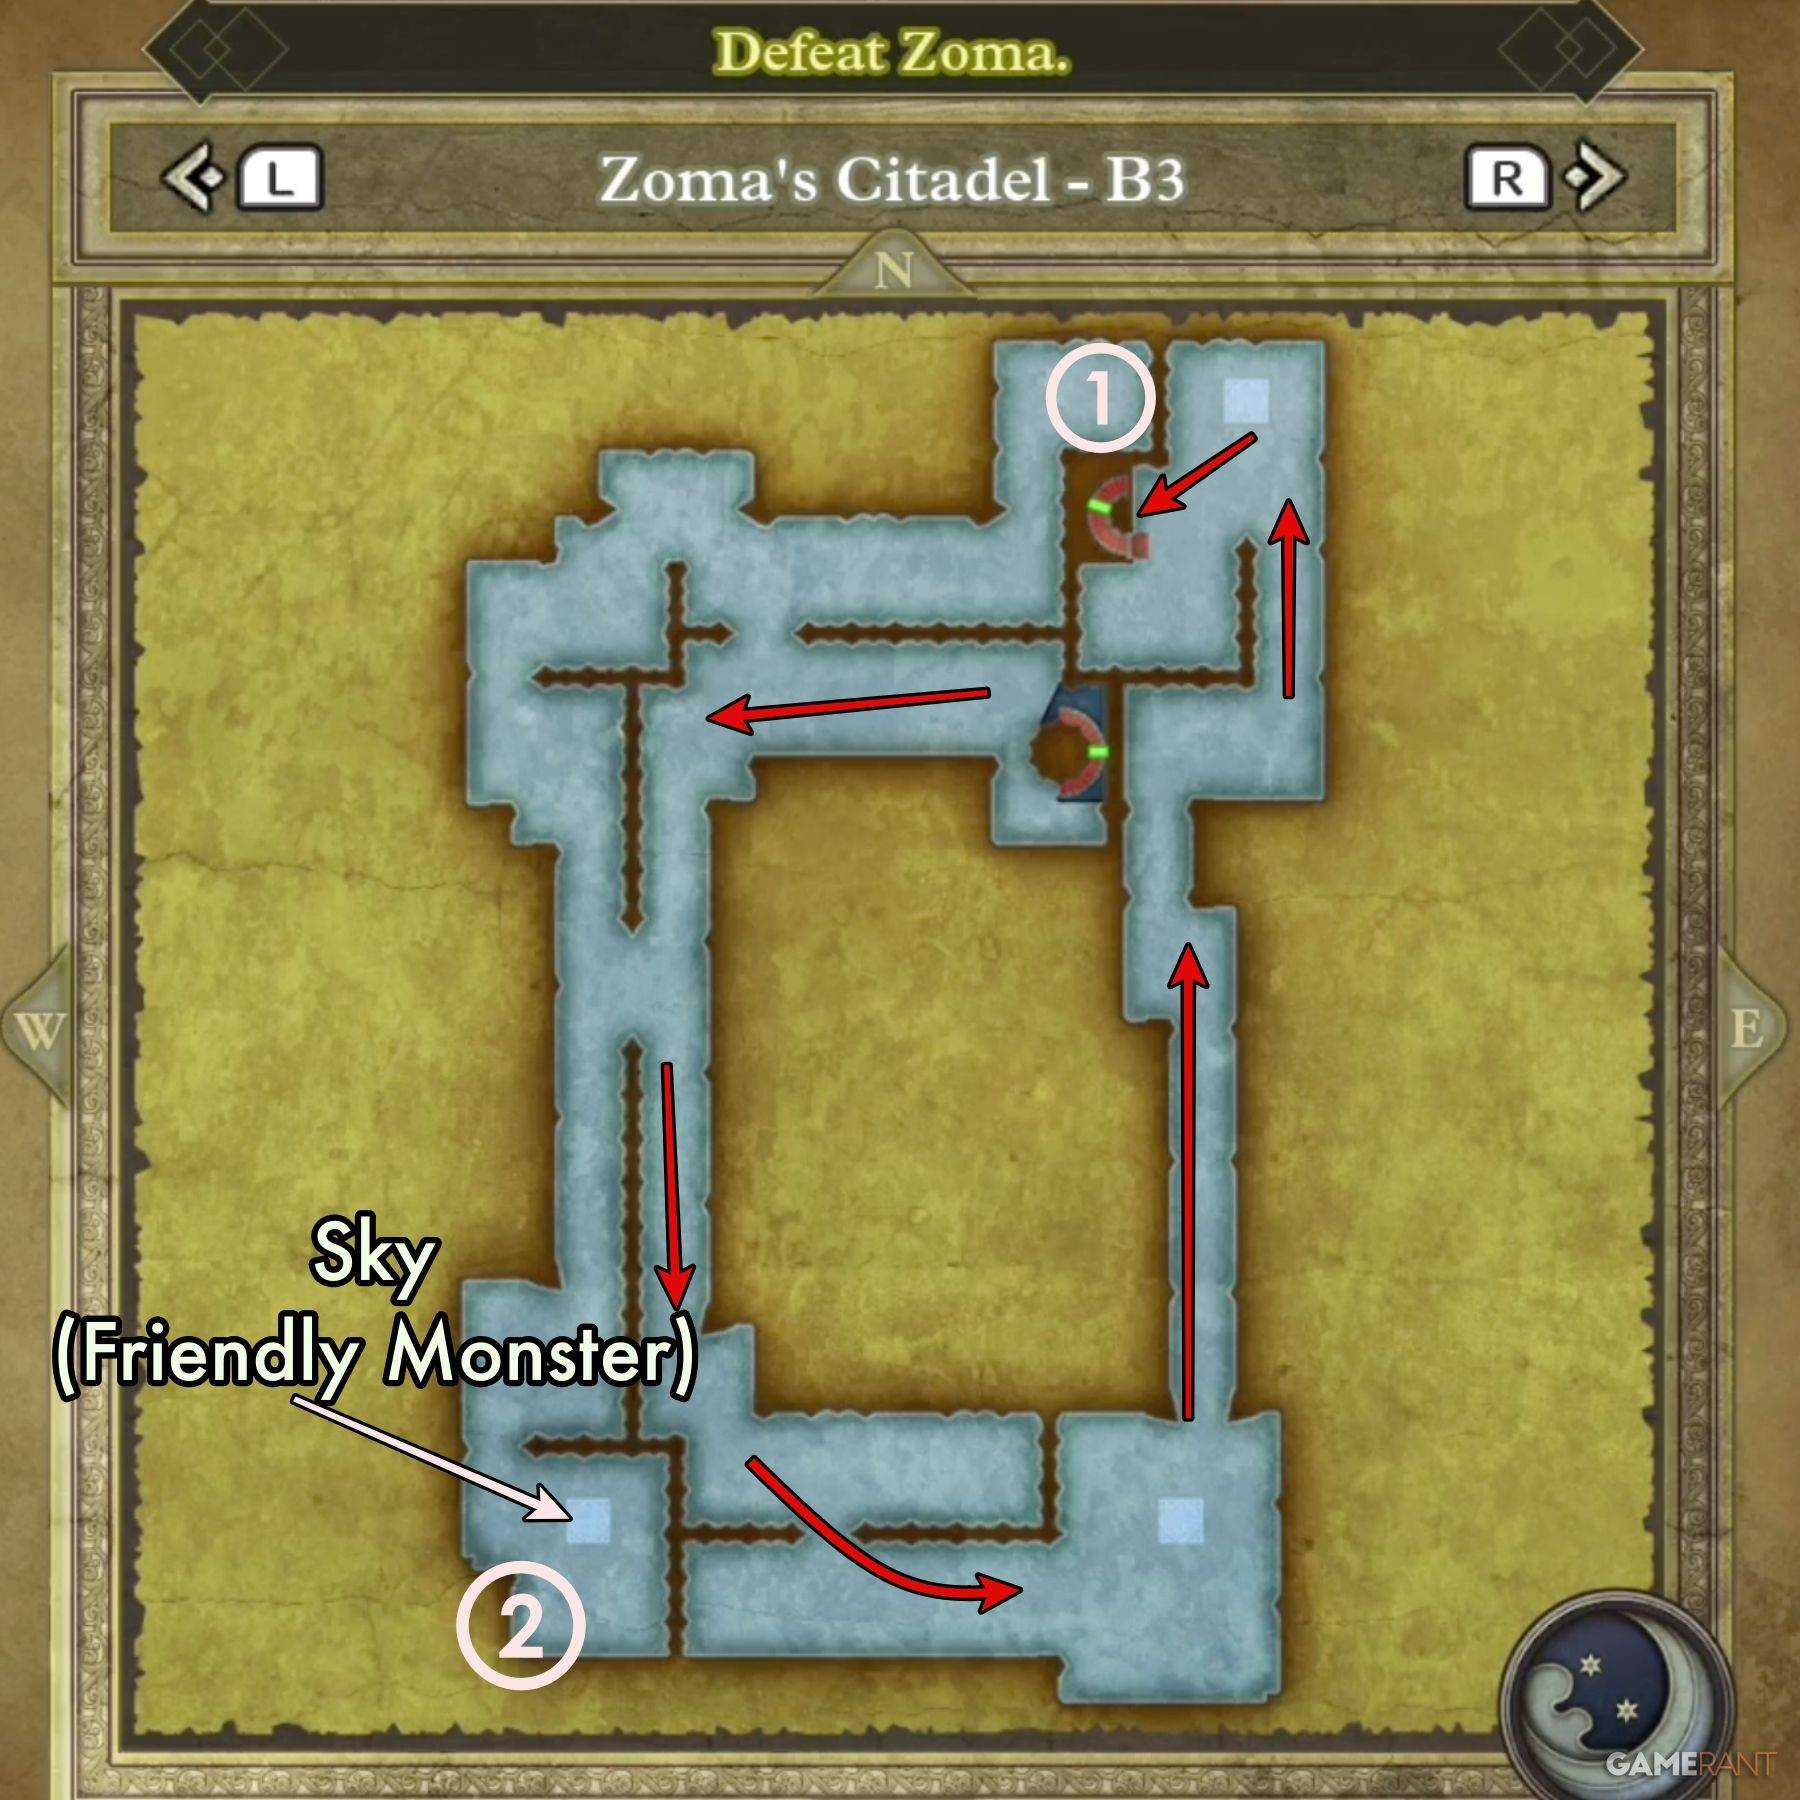 B3 is fairly straightforward, but be sure to check out the southwest corner for Sky, a friendly Soaring Scourger! There's also an isolated chamber you can access if you fall through a hole on B2. It's got a friendly Liquid Metal Slime and more treasure!
**B3 Treasure (Main Chamber):**
* Dragon Dojo Duds
* Double-Edged Sword
**B3 Treasure (Isolated Chamber):**
* Bastard Sword
B3 is fairly straightforward, but be sure to check out the southwest corner for Sky, a friendly Soaring Scourger! There's also an isolated chamber you can access if you fall through a hole on B2. It's got a friendly Liquid Metal Slime and more treasure!
**B3 Treasure (Main Chamber):**
* Dragon Dojo Duds
* Double-Edged Sword
**B3 Treasure (Isolated Chamber):**
* Bastard Sword
### Zoma's Citadel B4: The Final Stretch!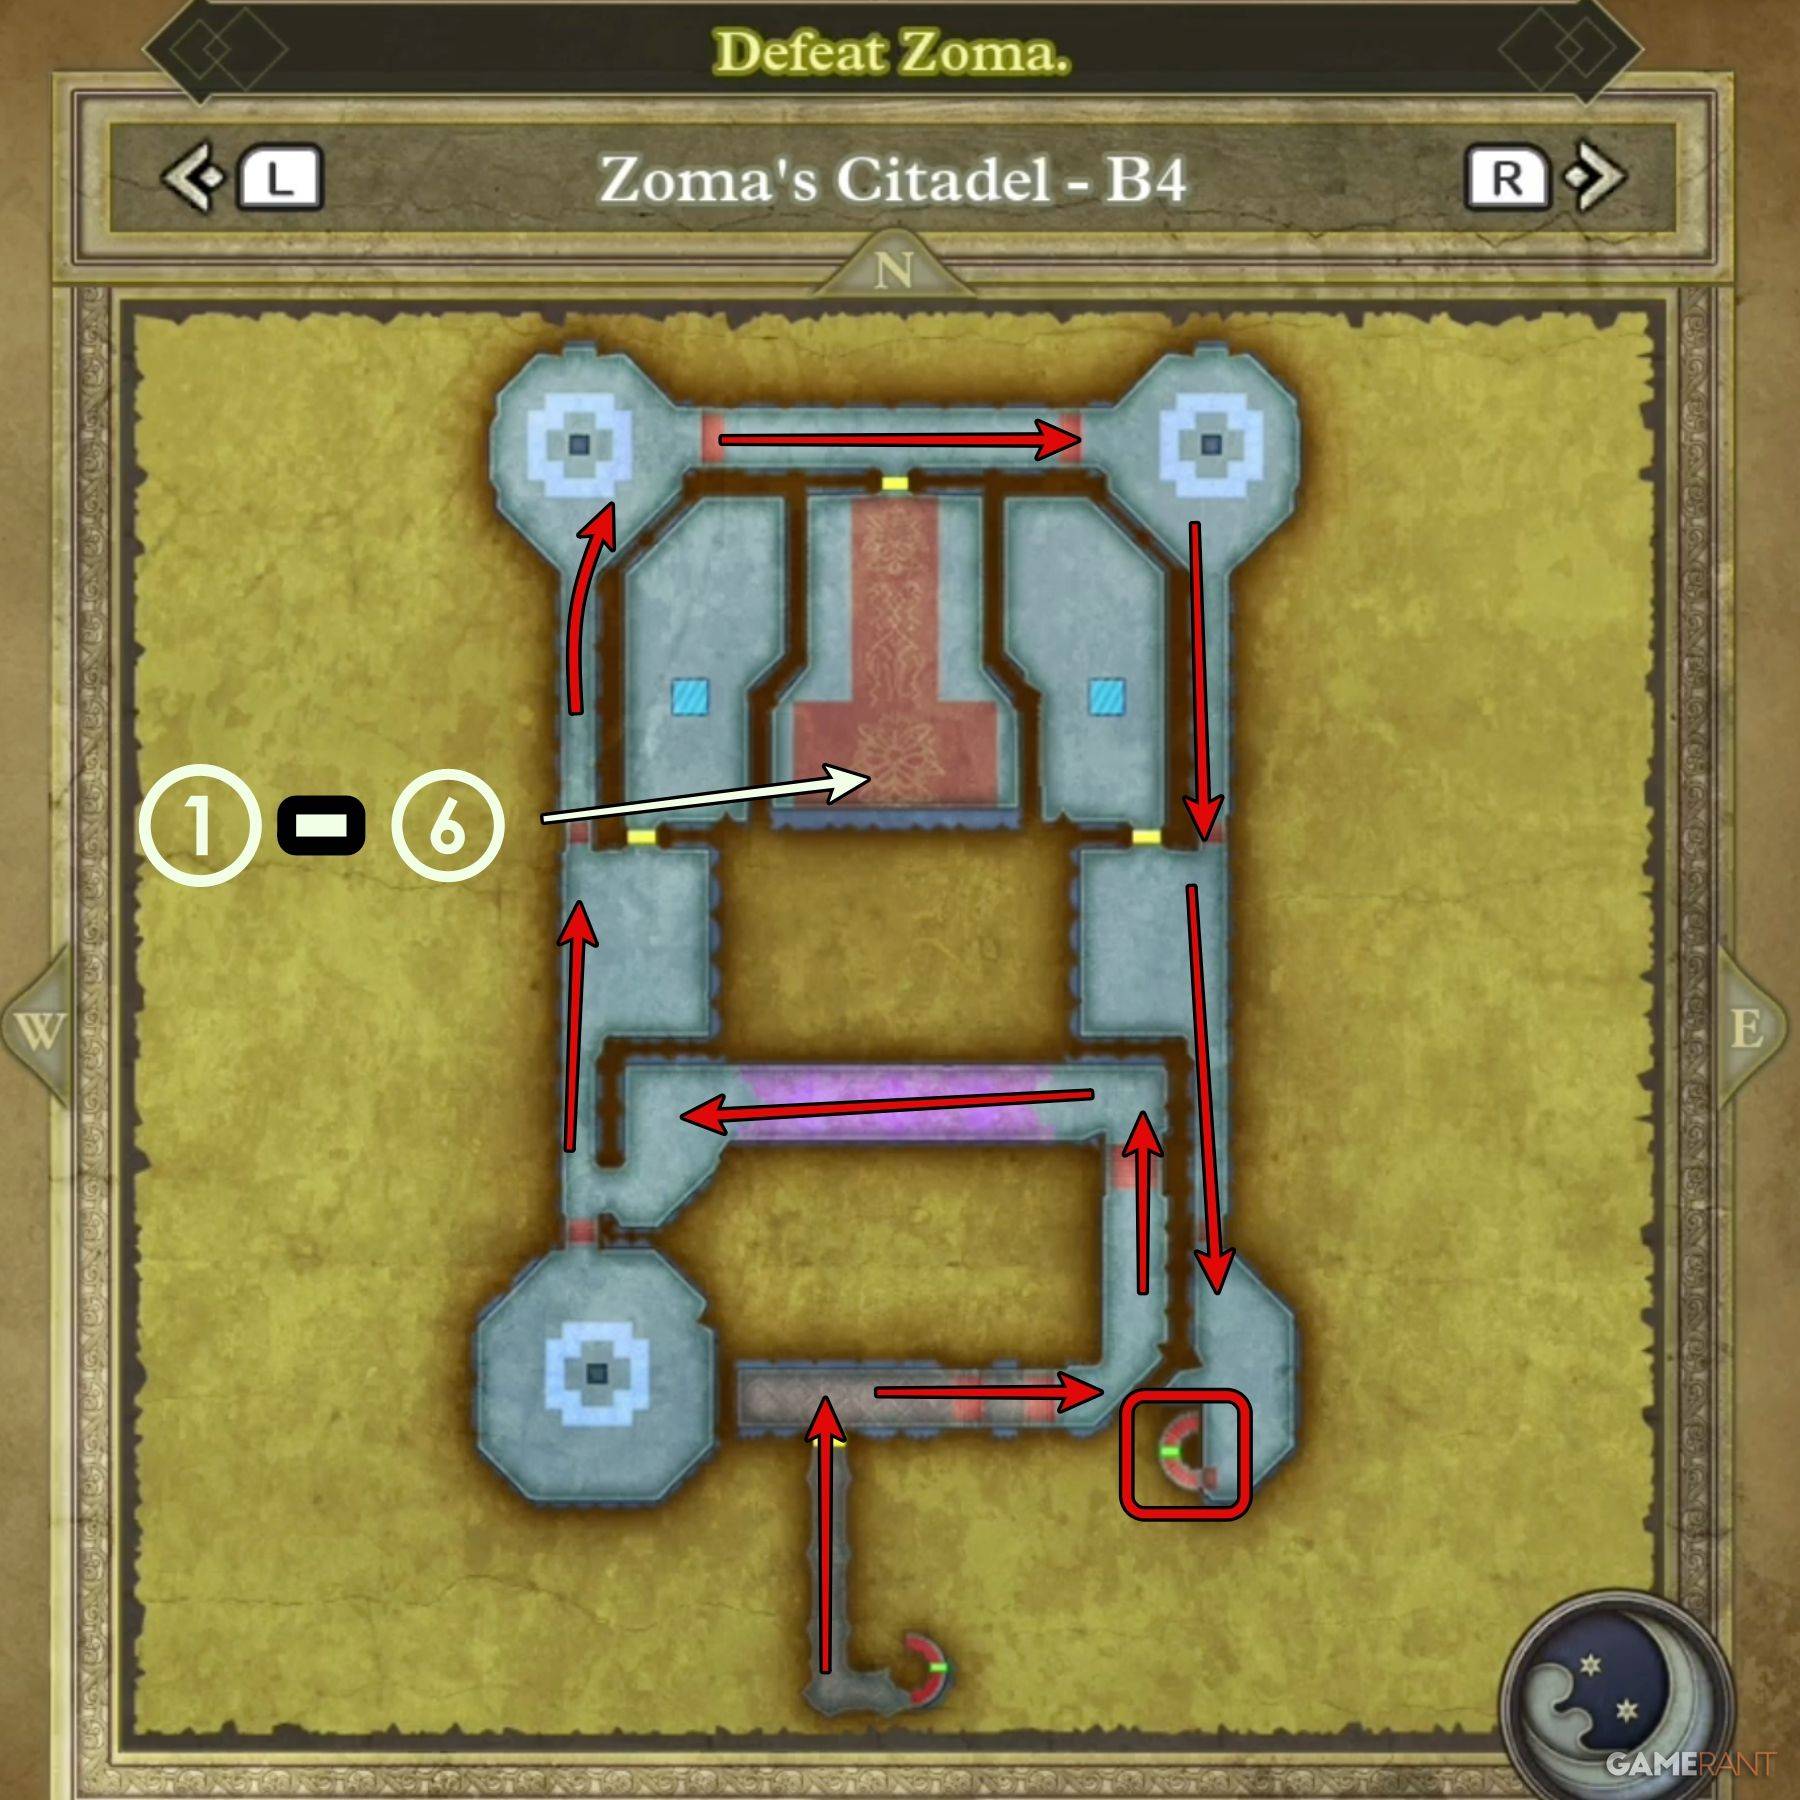 B4 is the final floor before the epic showdown with Zoma. Make your way around the chamber (check the map for the route), and be sure to watch the cutscene when you enter – it’s a good one.
**B4 Treasure:**
* Shimmering Dress
* Prayer Ring
* Sage's Stone
* Yggdrasil Leaf
* Dieamend
* Mini Medal
B4 is the final floor before the epic showdown with Zoma. Make your way around the chamber (check the map for the route), and be sure to watch the cutscene when you enter – it’s a good one.
**B4 Treasure:**
* Shimmering Dress
* Prayer Ring
* Sage's Stone
* Yggdrasil Leaf
* Dieamend
* Mini Medal
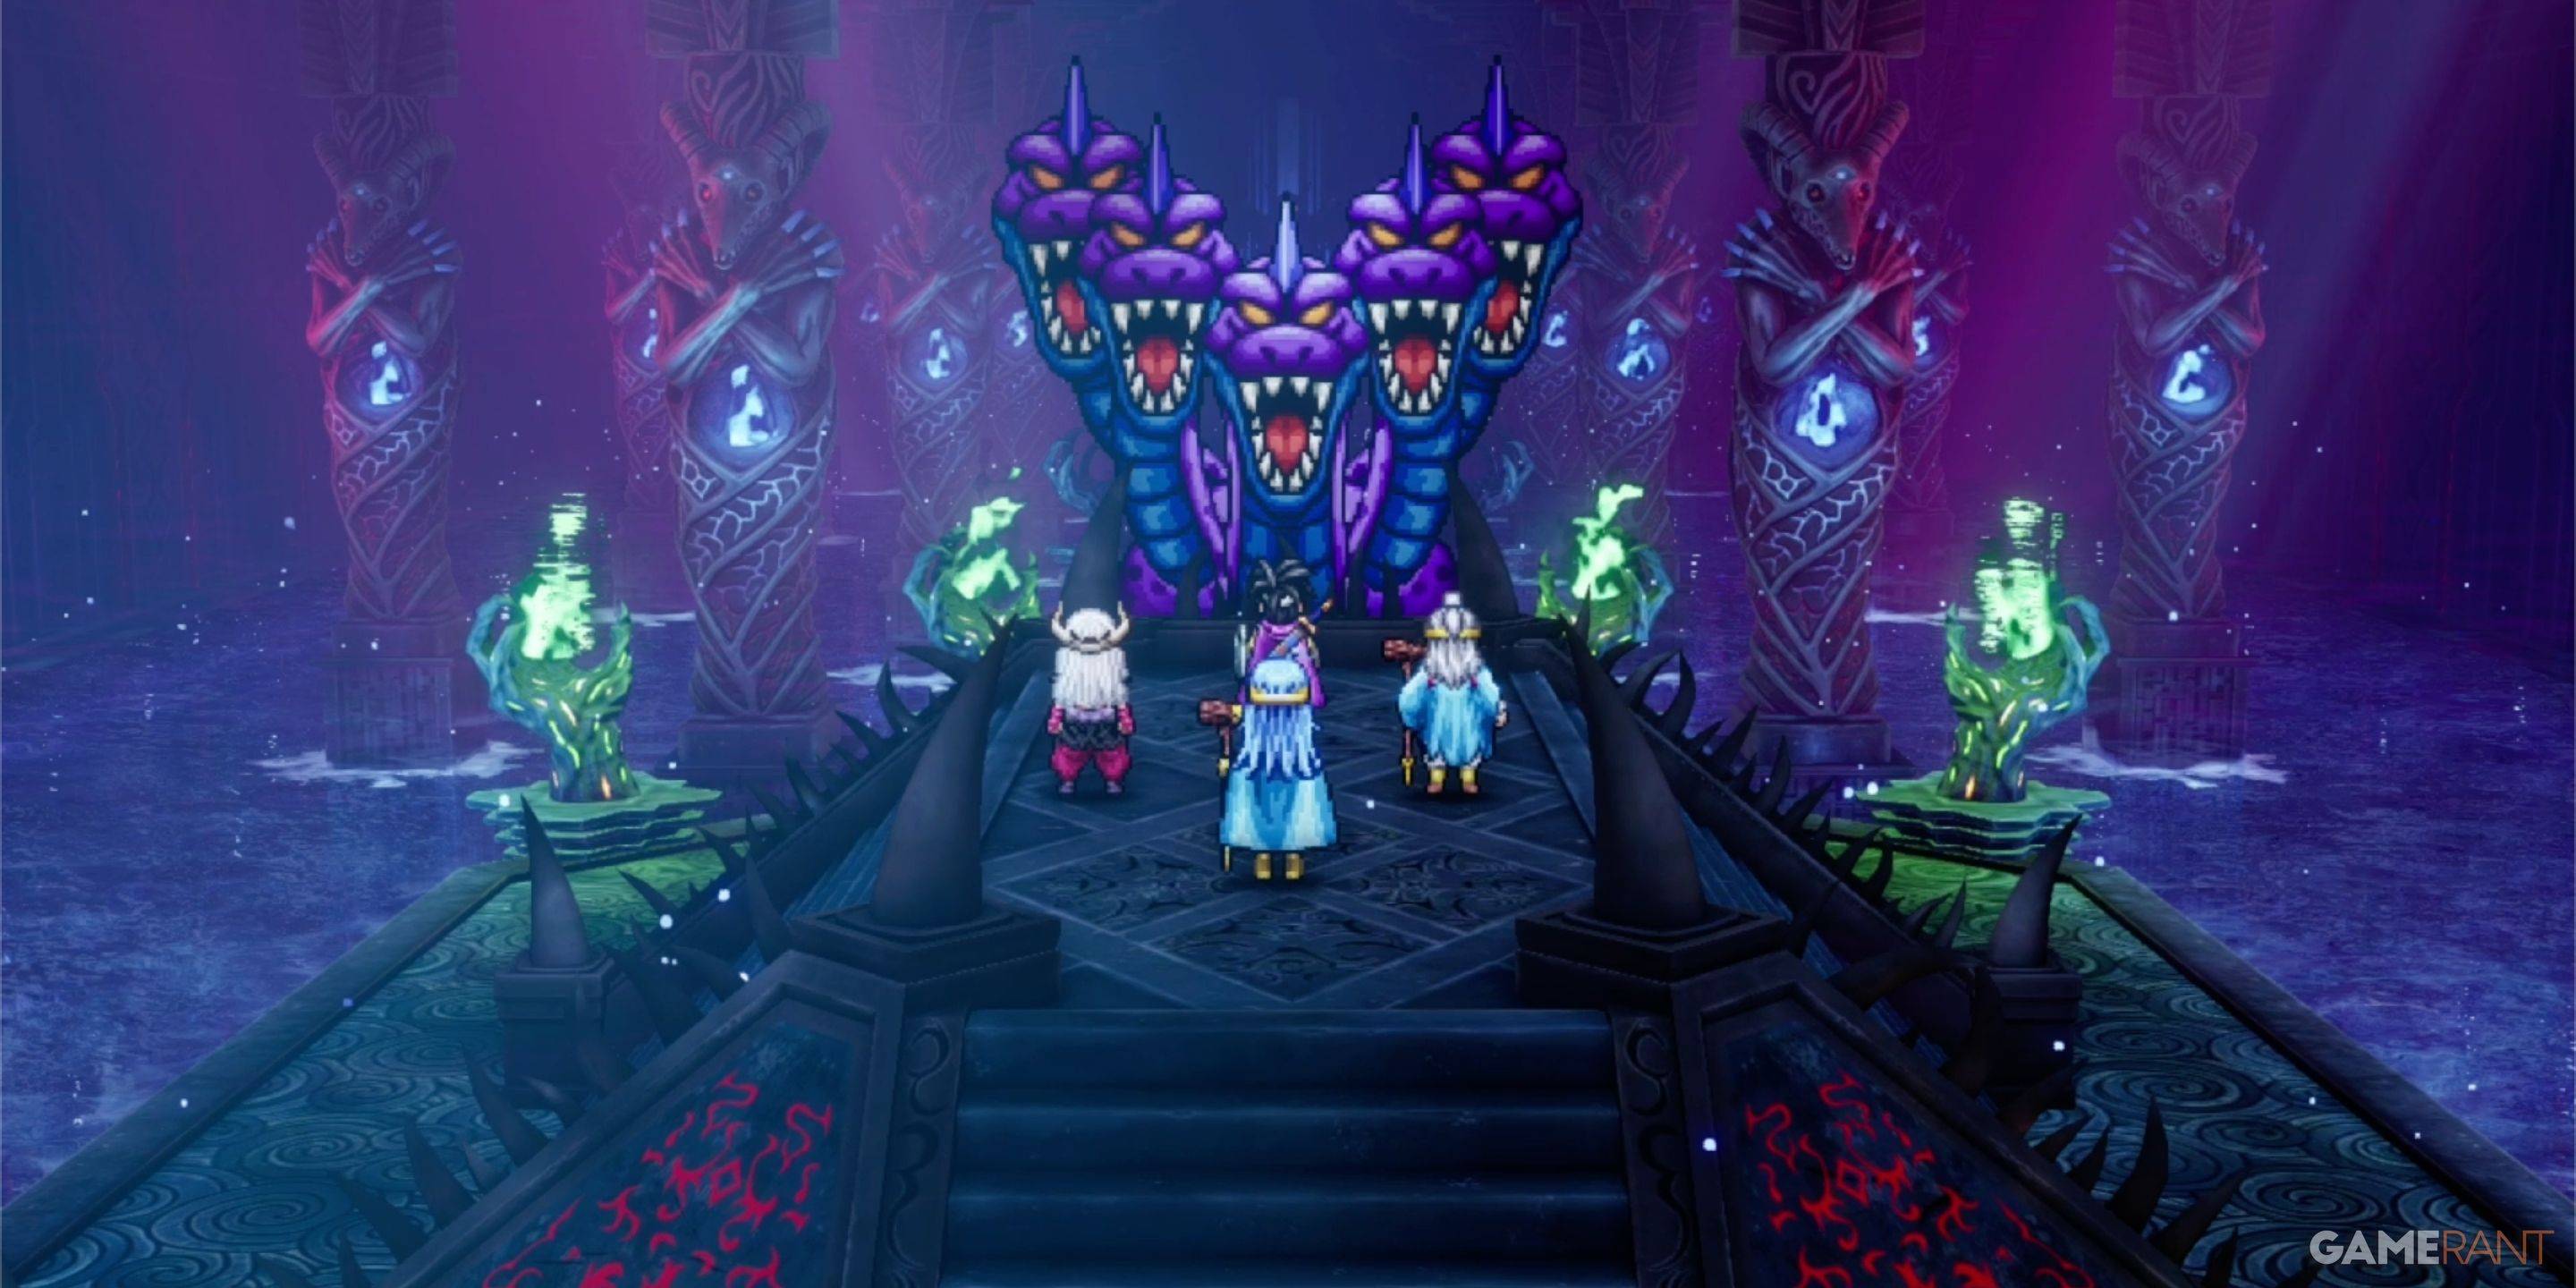
### Facing Zoma: The Final Boss Battle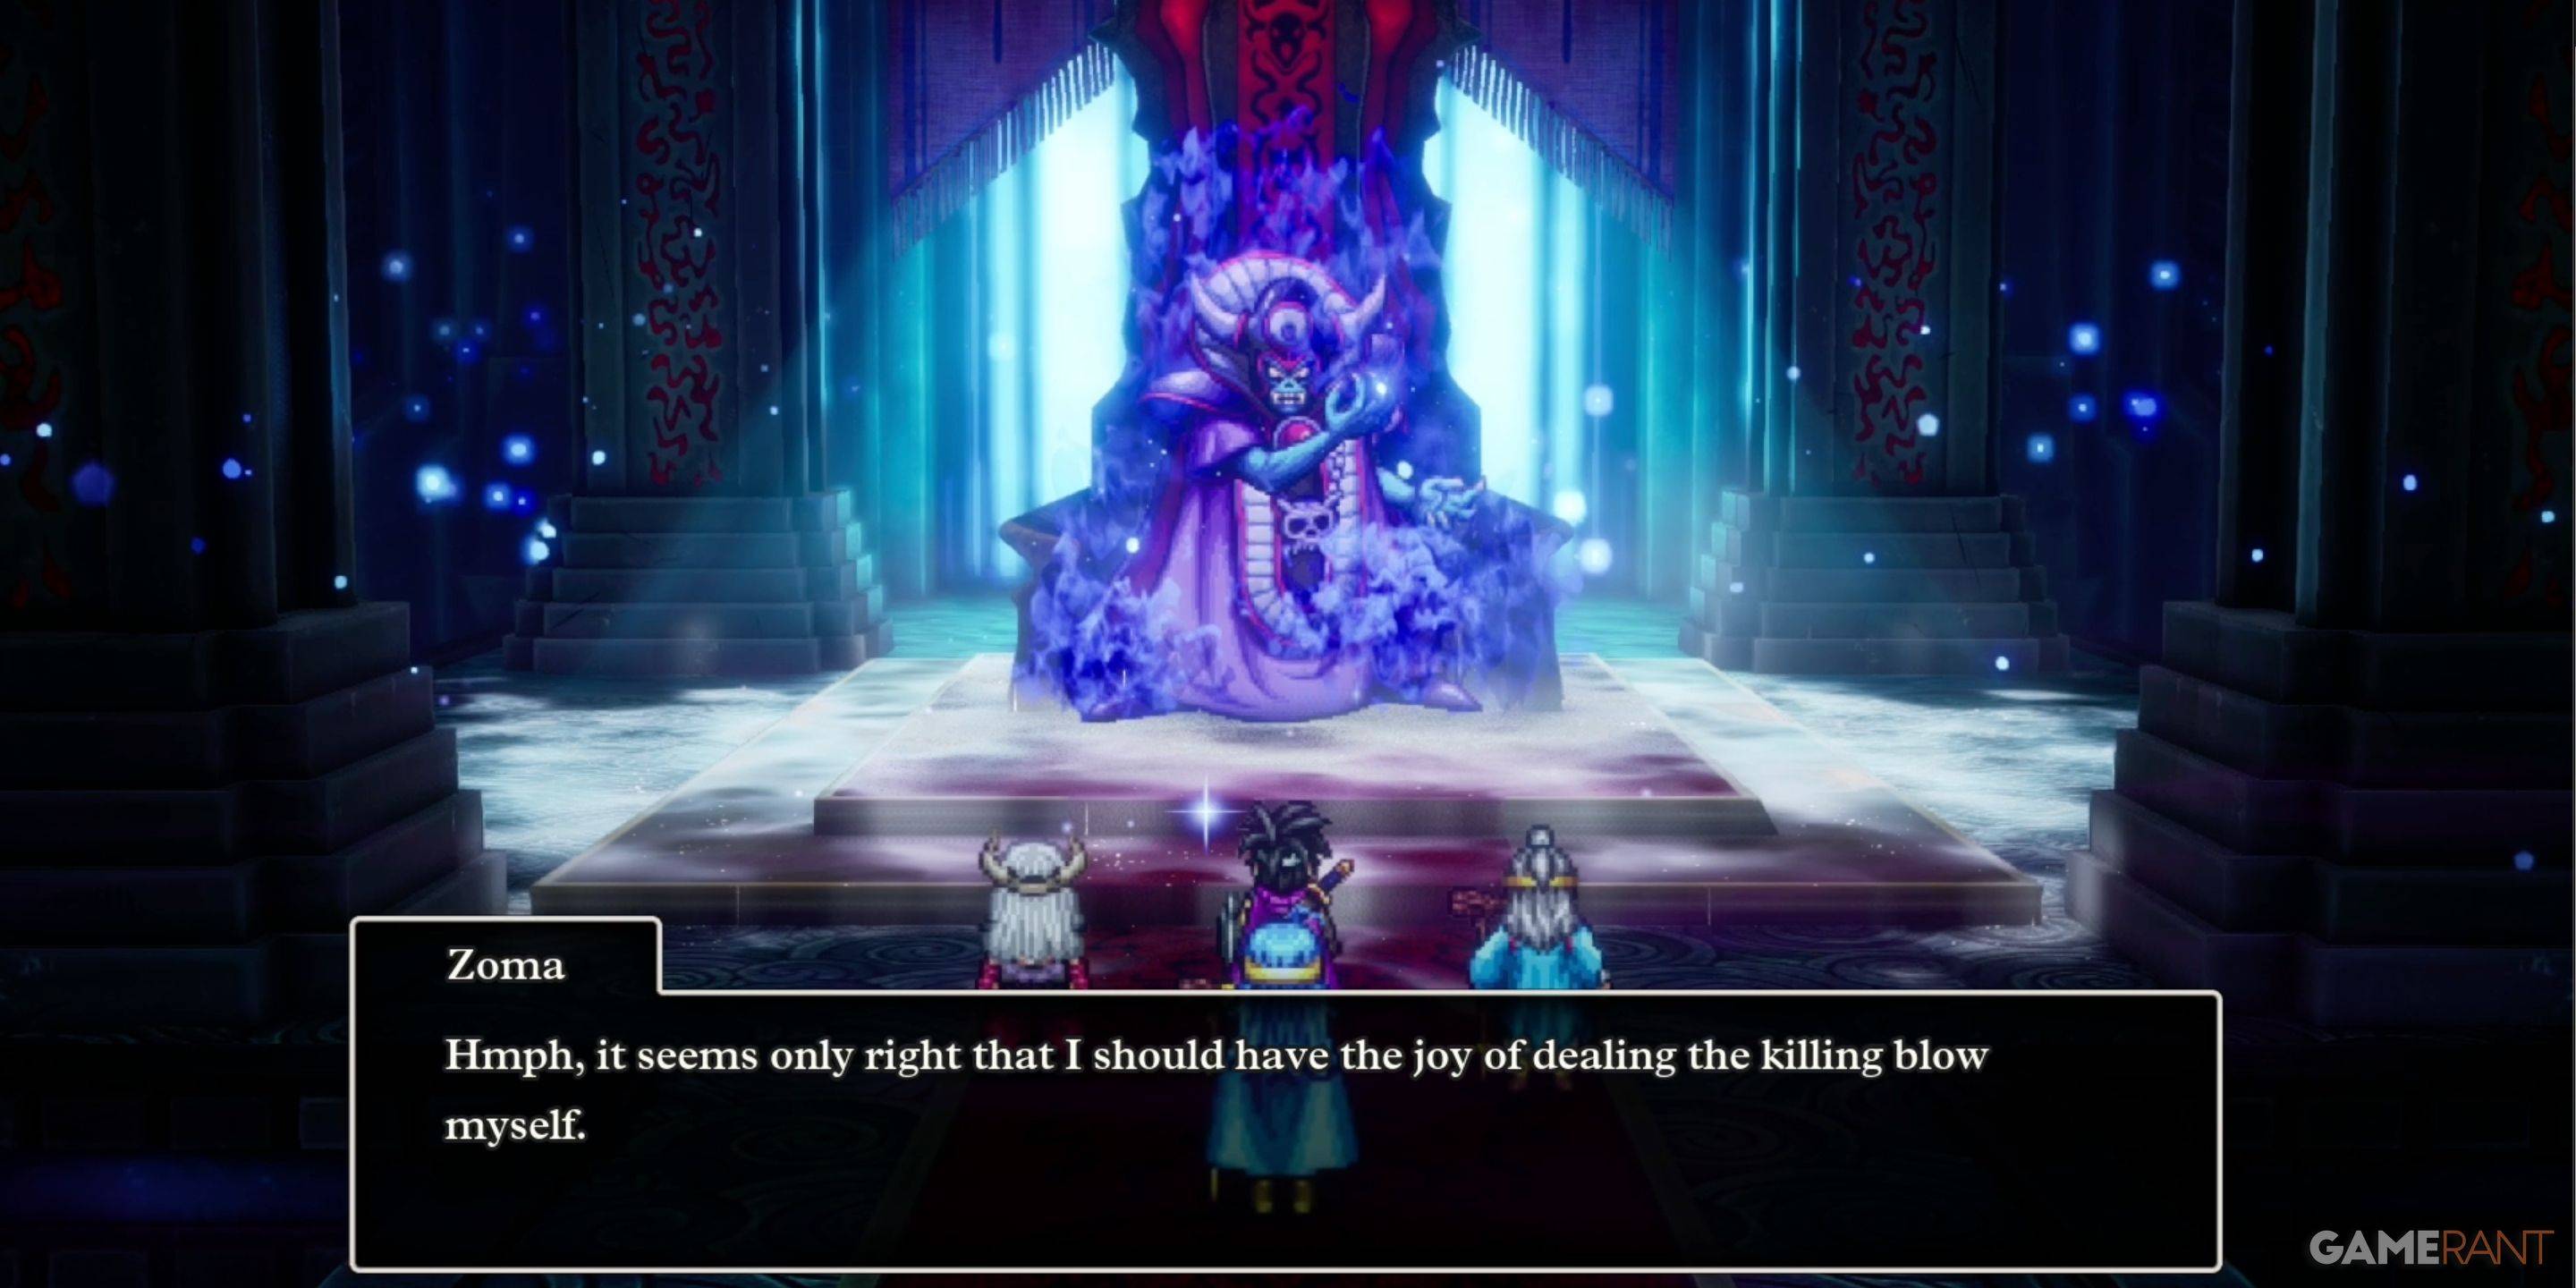 Before you reach Zoma, you'll have to battle the King Hydra, the Soul of Baramos, and the Bones of Baramos. It’s a boss gauntlet! Don't worry; you get a breather between each fight to use items.
**Strategies:** These bosses are tough, but they have weaknesses. Kazap spells are super effective against most of them. Use your best strategies, and remember to keep an eye on your party's HP!
Before you reach Zoma, you'll have to battle the King Hydra, the Soul of Baramos, and the Bones of Baramos. It’s a boss gauntlet! Don't worry; you get a breather between each fight to use items.
**Strategies:** These bosses are tough, but they have weaknesses. Kazap spells are super effective against most of them. Use your best strategies, and remember to keep an eye on your party's HP!
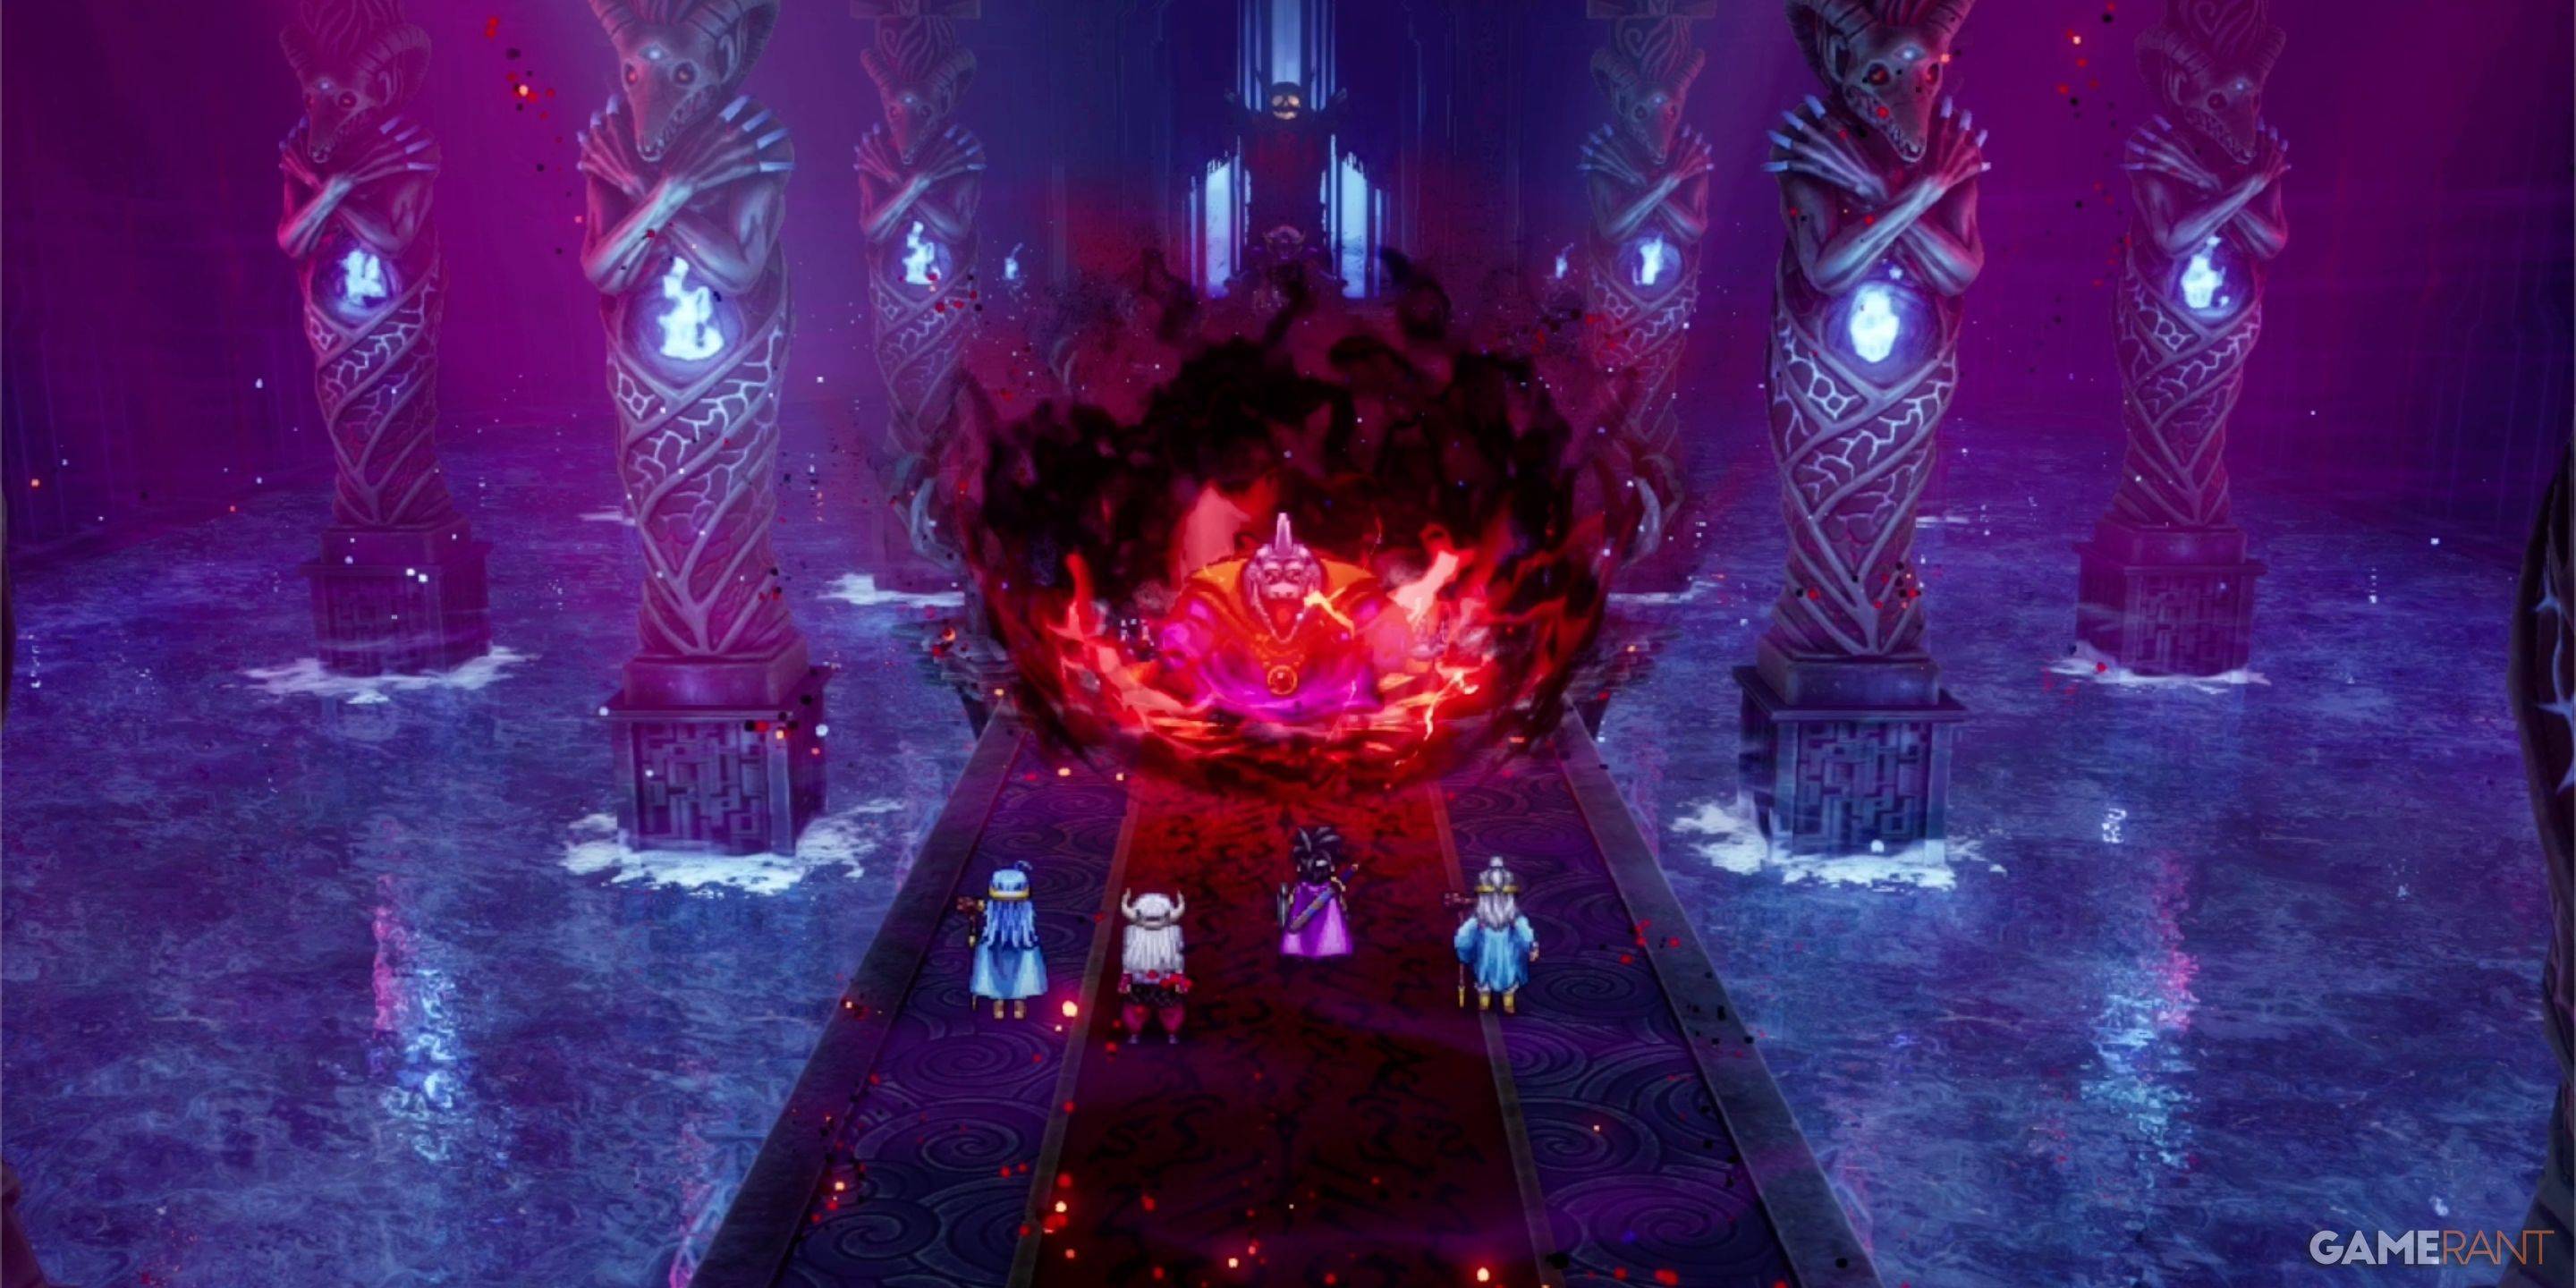
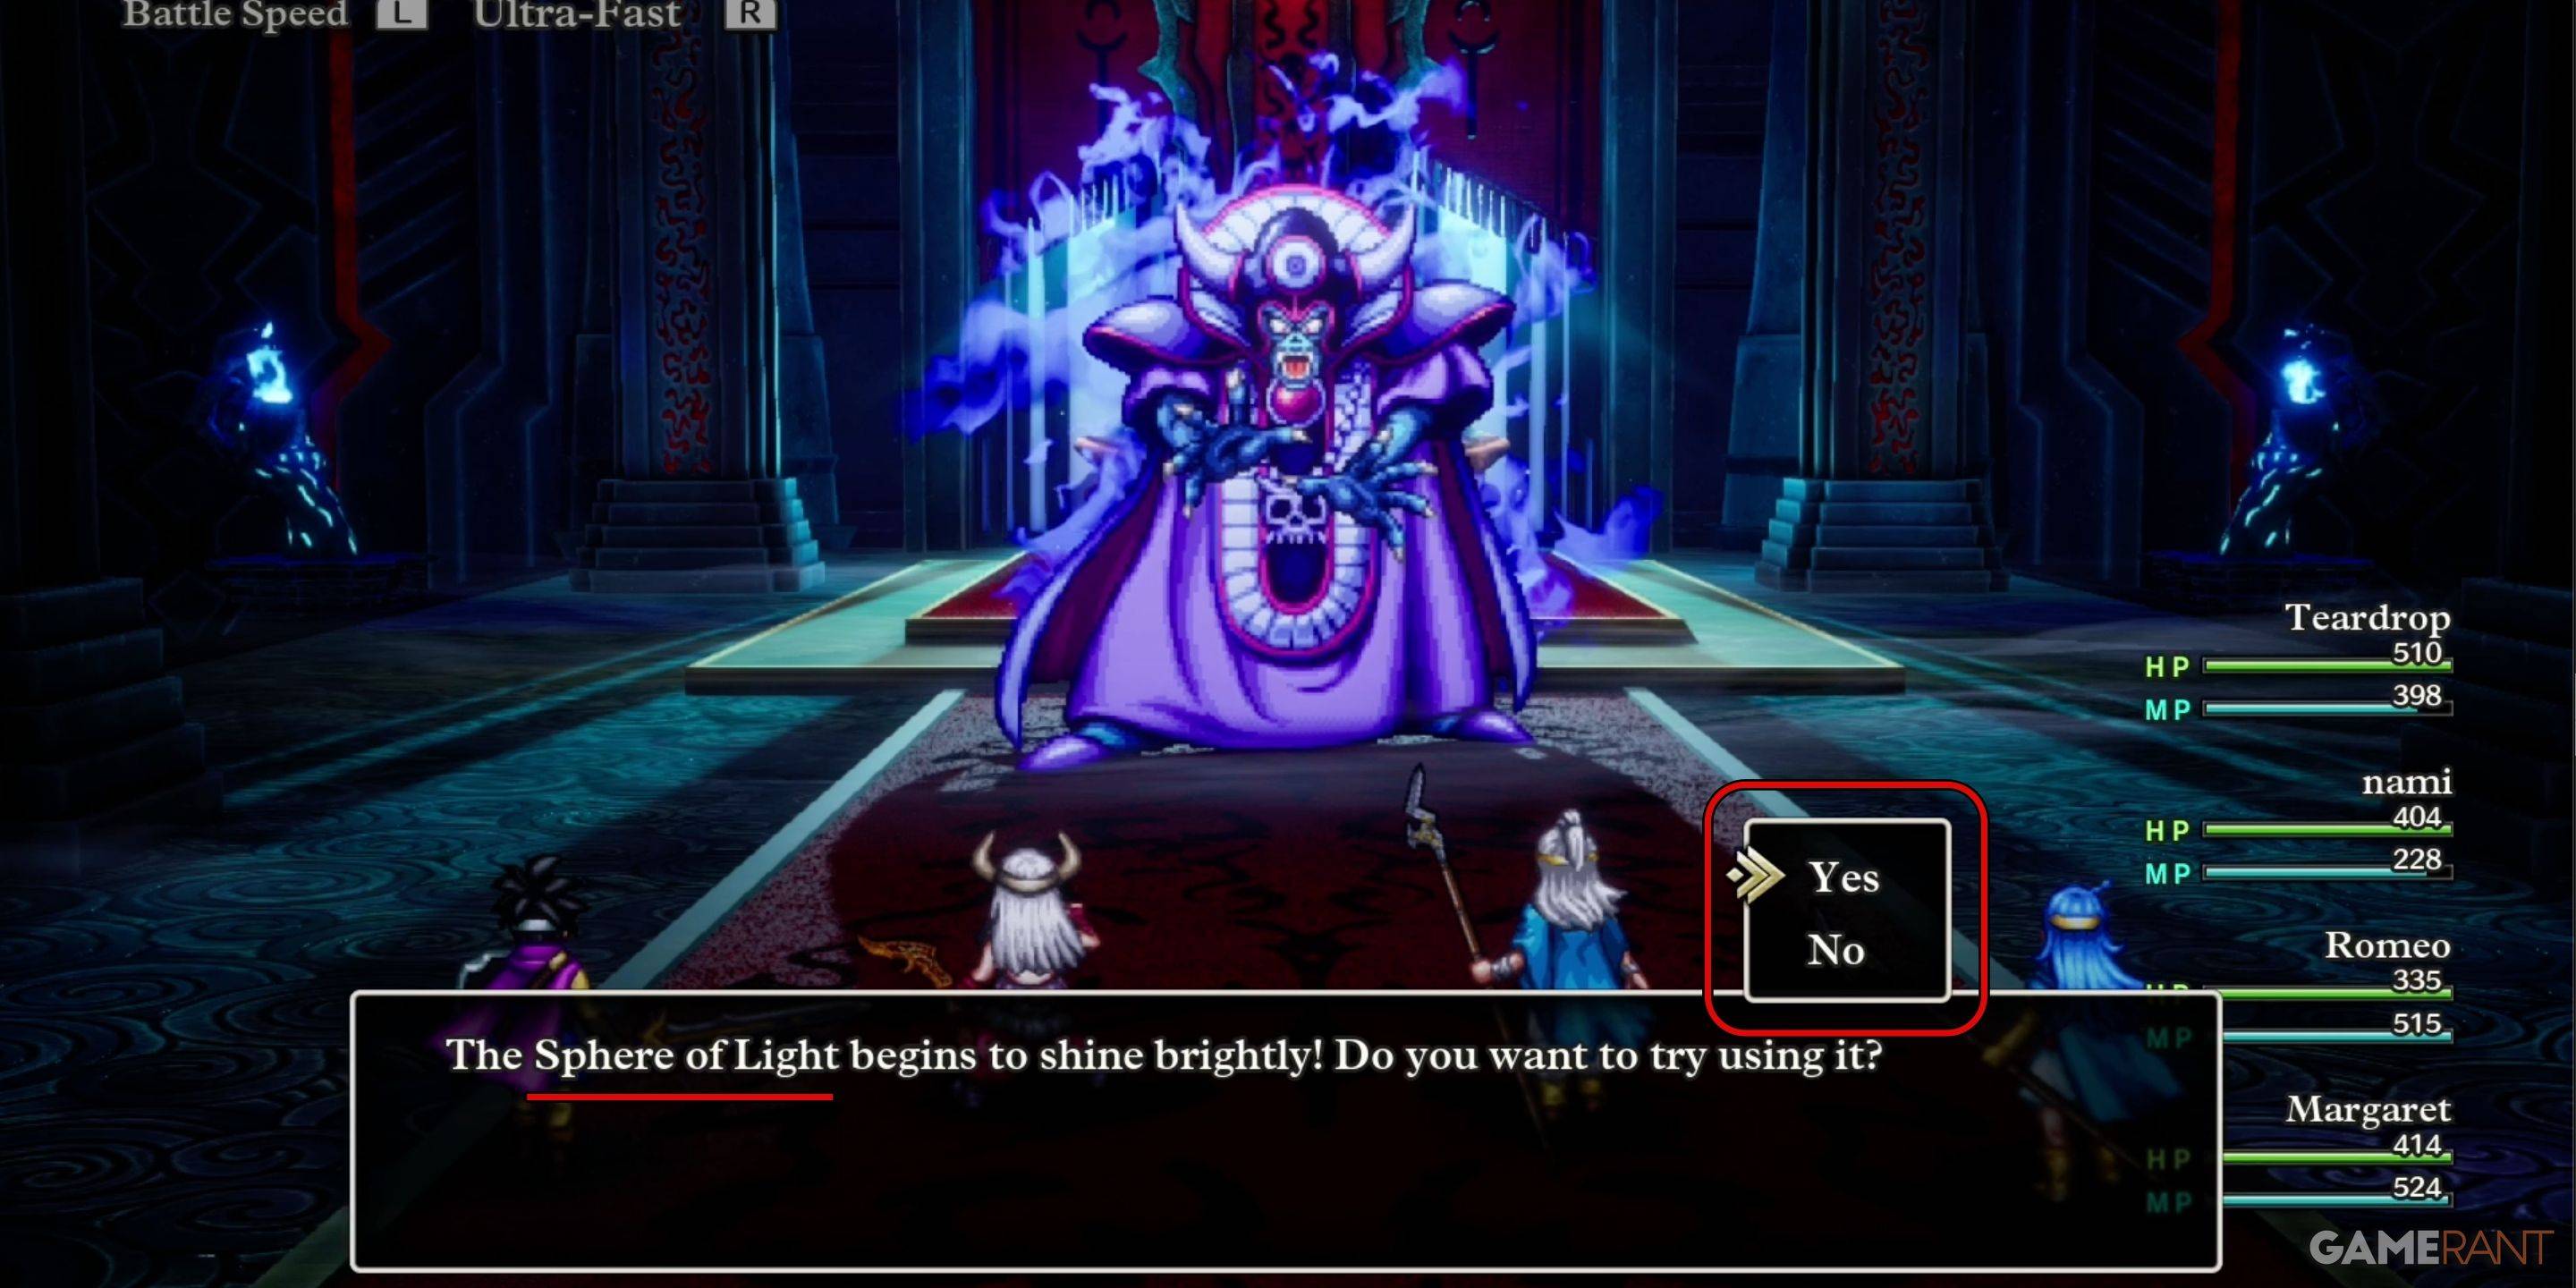
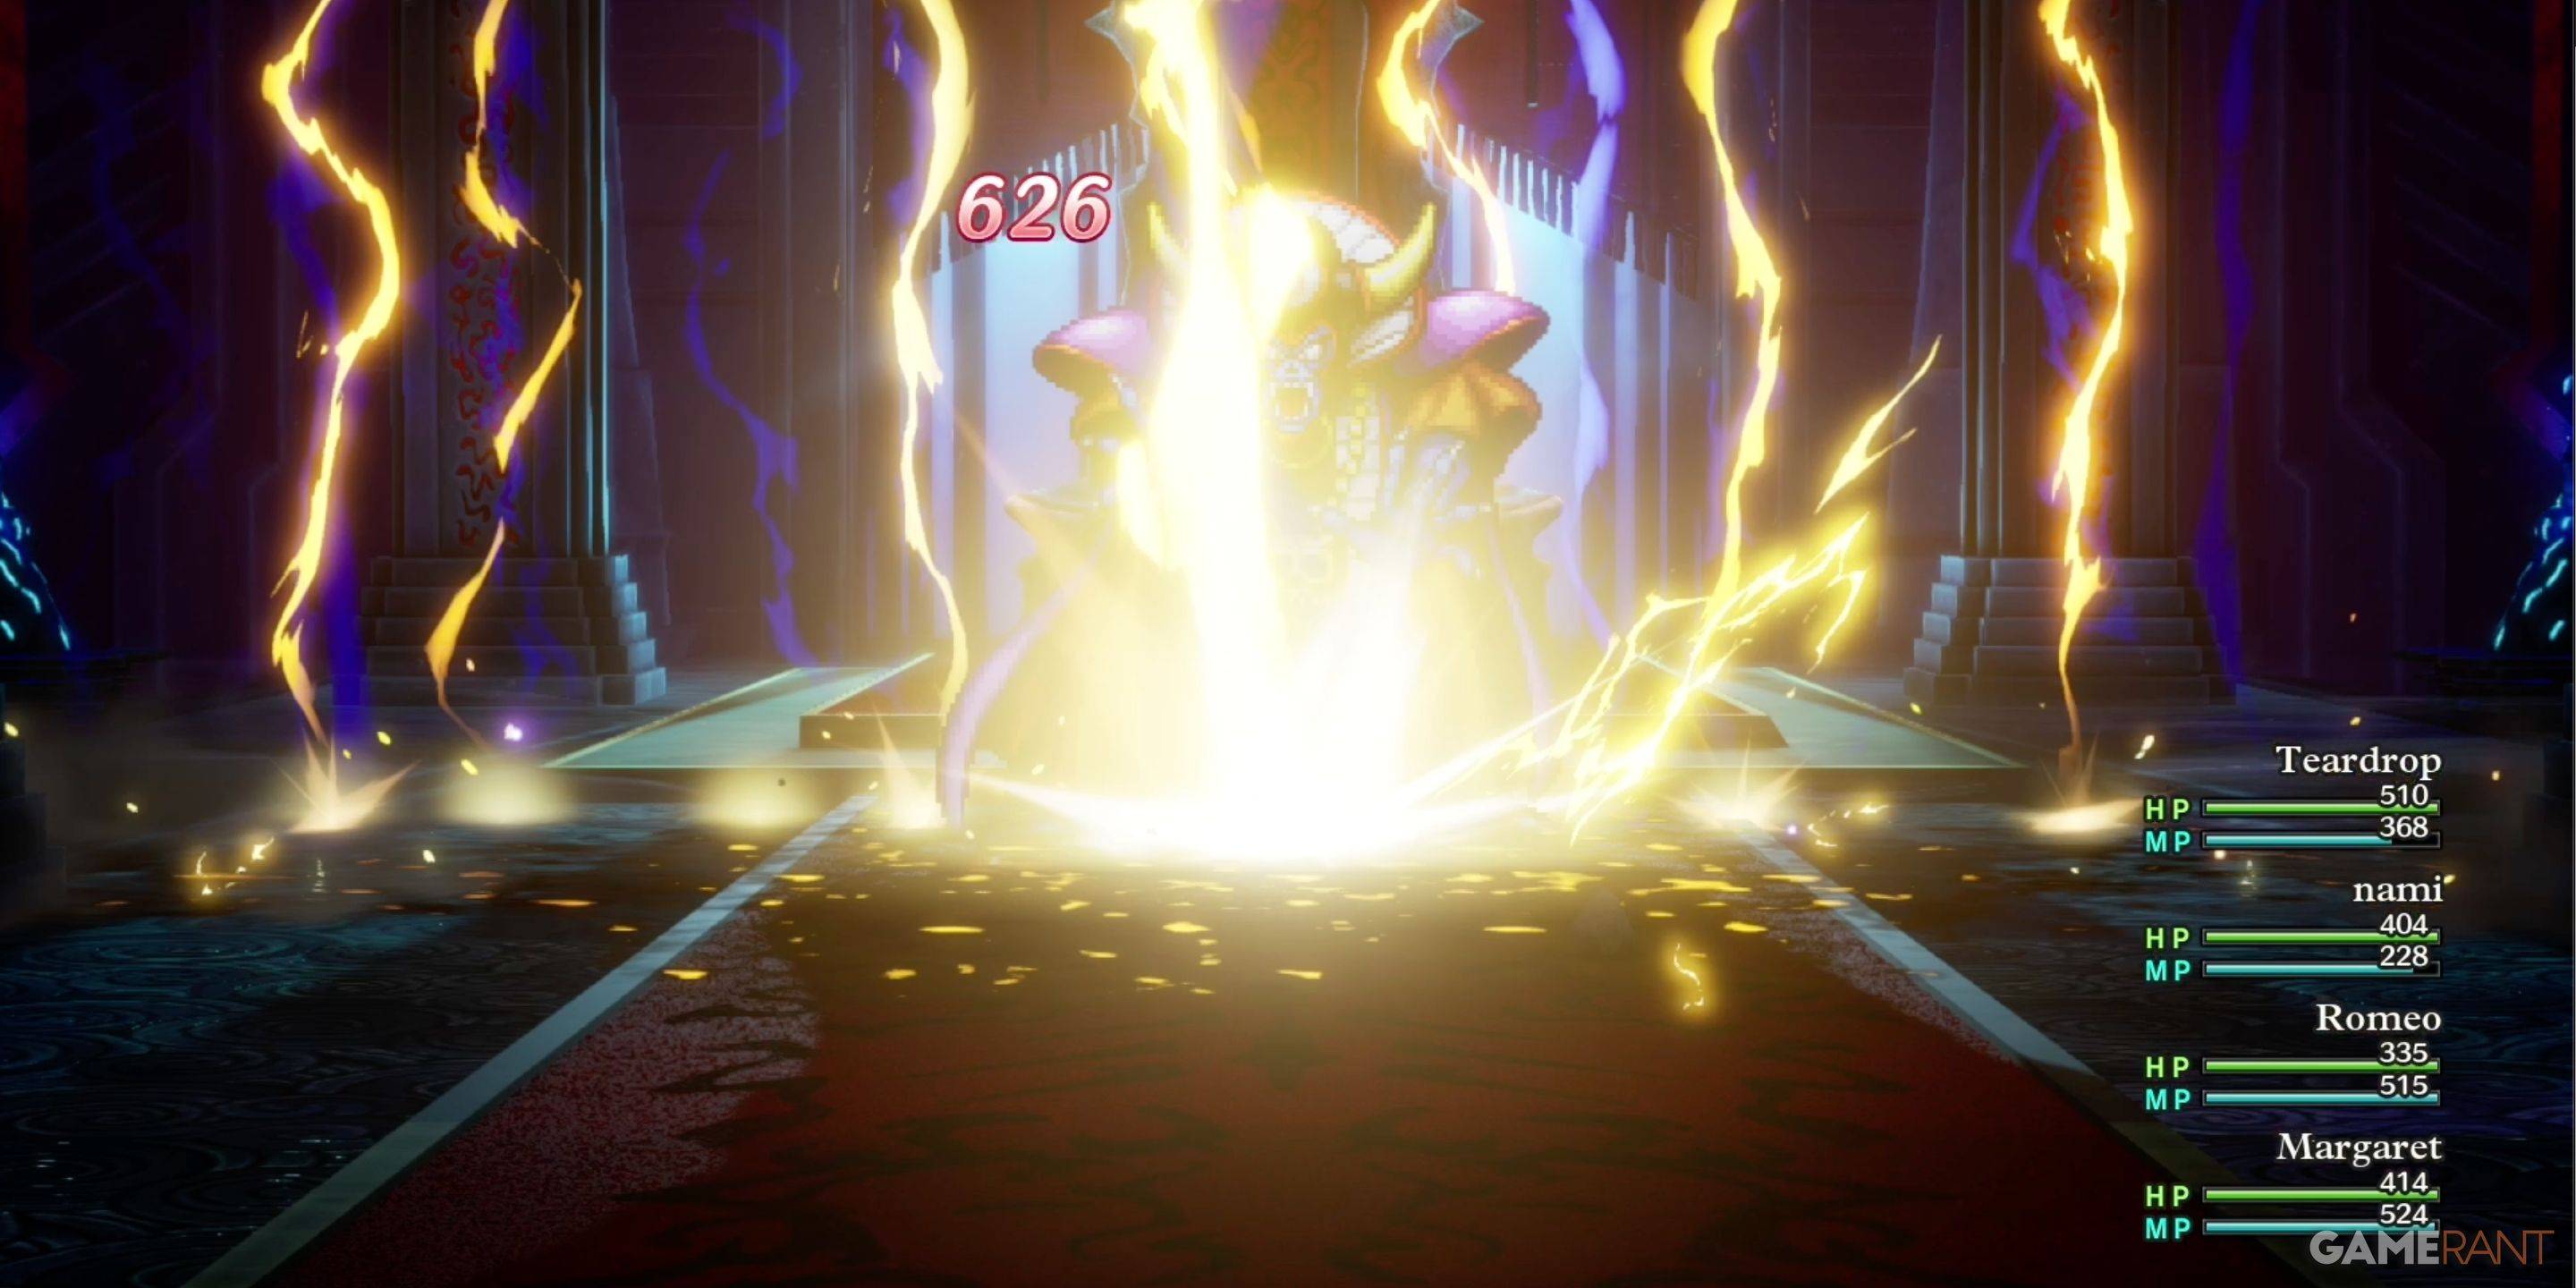
 Finally, you'll face Zoma himself. This fight is all about strategy and not rushing in headfirst. Wait for the Sphere of Light to remove Zoma's magic barrier, then unleash your most powerful spells. Kazap is your friend here! Don't be afraid to revive fallen party members.
### Monster Manual: Zoma's Citadel Bestiary Here's a quick rundown of the monsters you'll face in Zoma's Citadel and their weaknesses:
| Monster Name | Weakness |
|----------------------|----------|
| Dragon Zombie | None |
| Franticore | None |
| Great Troll | Zap |
| Green Dragon | None |
| Hocus-Poker | None |
| Hydra | None |
| Infernal Serpent | None |
| One-Man Army | Zap |
| Soaring Scourger | Zap |
| Troobloovoodoo | Zap |
Good luck, heroes! May your swords be sharp, your spells be potent, and your party be ready for anything! Go get 'em!
Here's a quick rundown of the monsters you'll face in Zoma's Citadel and their weaknesses:
| Monster Name | Weakness |
|----------------------|----------|
| Dragon Zombie | None |
| Franticore | None |
| Great Troll | Zap |
| Green Dragon | None |
| Hocus-Poker | None |
| Hydra | None |
| Infernal Serpent | None |
| One-Man Army | Zap |
| Soaring Scourger | Zap |
| Troobloovoodoo | Zap |
Good luck, heroes! May your swords be sharp, your spells be potent, and your party be ready for anything! Go get 'em!
### How to Reach Zoma's Citadel: A Quick Trip Through Rainbow Land
After you totally wreck Baramos (yeah, you!), you'll find yourself in Alefgard – a permanently gloomy place, but hey, at least it's dramatic! To get to Zoma's Citadel, you gotta craft the Rainbow Drop. Think of it as a super-powered key. Here's the recipe:
* **Sunstone:** Grab this from Tantegel Castle. It's probably not hiding under a rock, so keep your eyes peeled.
* **Staff of Rain:** The Shrine of the Spirit is where this one's chillin'.
* **Sacred Amulet:** Rescue Rubiss from the top of her tower (you'll need the Faerie Flute for this). She'll reward you handsomely!
Once you've got all three, BAM! Rainbow Drop assembled. Use it to build the Rainbow Bridge – your personal VIP express lane to Zoma's Citadel.
### Zoma's Citadel 1F: Navigating the First Floor Maze
The first floor is a bit of a head-scratcher, but don't sweat it. The main goal is to find that throne – it's a secret passage in disguise! You'll need to go around the east or west side of the chamber before finding the door to the central area. Check the map above for the exact route. There are some goodies tucked away in the side chambers, so explore! You'll face a bunch of Living Statues in the central chamber. They're tough, but nothing you can't handle with a solid strategy.
**1F Treasure:**
* Mini Medal (buried behind the throne)
* Seed of Magic (check the electrified panel – be careful!)
### Zoma's Citadel B1: A Quick Stop
B1 is pretty straightforward. Unless you take the stairs from the small chambers on 1F, you'll just find a staircase down to B2. But if you explore the side chambers, there’s a treasure chest in the isolated B1 area:
**B1 Treasure:**
* Hapless Helm
### Zoma's Citadel B2: Directional Tile Troubles
B2 introduces the dreaded directional tiles. These things are *tricky*. The goal is to cross them to reach the stairs to B3. If you're struggling, consider practicing on the similar tiles in the Tower of Rubiss (third floor, northwest corner). They’re basically a training ground for this puzzle.
**How to conquer the tiles:** Think of the diamond-shaped tiles like a D-pad. Blue usually means North/South, Orange usually means East/West. Pay close attention to the color positions to figure out which direction to press on your D-pad. It takes some practice, but you'll get the hang of it!
**B2 Treasure:**
* Scourge Whip
* 4,989 Gold Coins (cha-ching!)
### Zoma's Citadel B3: A Friendly Face (and Some Treasure!)
B3 is fairly straightforward, but be sure to check out the southwest corner for Sky, a friendly Soaring Scourger! There's also an isolated chamber you can access if you fall through a hole on B2. It's got a friendly Liquid Metal Slime and more treasure!
**B3 Treasure (Main Chamber):**
* Dragon Dojo Duds
* Double-Edged Sword
**B3 Treasure (Isolated Chamber):**
* Bastard Sword
### Zoma's Citadel B4: The Final Stretch!
B4 is the final floor before the epic showdown with Zoma. Make your way around the chamber (check the map for the route), and be sure to watch the cutscene when you enter – it’s a good one.
**B4 Treasure:**
* Shimmering Dress
* Prayer Ring
* Sage's Stone
* Yggdrasil Leaf
* Dieamend
* Mini Medal
### Facing Zoma: The Final Boss Battle
Before you reach Zoma, you'll have to battle the King Hydra, the Soul of Baramos, and the Bones of Baramos. It’s a boss gauntlet! Don't worry; you get a breather between each fight to use items.
**Strategies:** These bosses are tough, but they have weaknesses. Kazap spells are super effective against most of them. Use your best strategies, and remember to keep an eye on your party's HP!
Finally, you'll face Zoma himself. This fight is all about strategy and not rushing in headfirst. Wait for the Sphere of Light to remove Zoma's magic barrier, then unleash your most powerful spells. Kazap is your friend here! Don't be afraid to revive fallen party members.
### Monster Manual: Zoma's Citadel Bestiary
Here's a quick rundown of the monsters you'll face in Zoma's Citadel and their weaknesses:
| Monster Name | Weakness |
|----------------------|----------|
| Dragon Zombie | None |
| Franticore | None |
| Great Troll | Zap |
| Green Dragon | None |
| Hocus-Poker | None |
| Hydra | None |
| Infernal Serpent | None |
| One-Man Army | Zap |
| Soaring Scourger | Zap |
| Troobloovoodoo | Zap |
Good luck, heroes! May your swords be sharp, your spells be potent, and your party be ready for anything! Go get 'em!
Latest News
more >

Top News
-
Emoak launches its latest casual puzzle game, now available on mobile platforms
-

No Snooze? You Lose! SF6 Tournament “Sleep Fighter” Requires You to Rest
-

Stumble Guys joins hands with My Hero Academia, heroic adventures are waiting for you!
-

Fortnite Re-Releases Paradigm Skin By Accident, Lets Players Keep It Anyways